Description
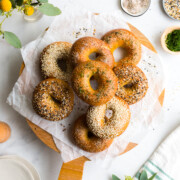
With a perfectly golden, chewy crust & soft interior these Best Basic Bagels are truly the best homemade bagels. Top with whatever makes your bagel whole.
Ingredients
Units
Scale
BAGEL DOUGH
- 1 tablespoon date syrup, barley malt syrup, honey or sugar
- 1 1/4 teaspoons active dry yeast
- 2 teaspoons fine sea salt
- 1 1/4 cup lukewarm water (95°- 105°-ish)
- 4 cups bread flour or high gluten flour
POACHING LIQUID
- 8-10 cups water
- 1 1/2 tablespoons date syrup, barley malt syrup or honey
- 1 tablespoon baking soda
- 1 teaspoon salt
Instructions
MIXING THE BAGEL DOUGH
- Stir the date syrup (or alternative), active dry yeast, and lukewarm water together in the bowl of a stand mixer or a large mixing bowl. Allow the mix to hang out and bubble up for 5-7ish minutes until the yeast has bloomed up.
- Add the flour and salt to the mixing bowl. If using a mixer, use the dough hook and mix on the lowest speed for 3 minutes. If mixing by hand, use a large, sturdy wooden spoon and stir for at least 3 minutes, until fully blended. The dough should form a stiff ball, and the flour should be fully hydrated. If it isn’t, mix in a bit more water. Allow the dough rest for 5 minutes.
- Continue mixing in the stand mixer with the dough hook on the lowest speed for another 5+ minutes. Or transfer to clean work surface and knead by hand for about 6-8 minutes to develop the gluten. The dough should be stiff but supple and just barely tacky. If the dough seems too soft or tacky, mix or knead in a bit more flour.
- Place the dough in a clean, lightly oiled bowl, cover with plastic wrap or a clean kitchen towel, and allow the dough rise at room temperature for 1 hour, until it's doubled in size.
SHAPING THE BAGELS
- Prep a sheet pan by lining it with a silicone baking mat or parchment paper, spray the parchment paper with spray oil or lightly brush it with oil.
Using a kitchen scale, divide the dough into 8 equal pieces. (A typical bagel is in the 110 gram range.) If you don't have a scale, just eyeball it as best as possible.
You shouldn't need any flour on the work surface. If the dough feels too dry, lightly spritz the work surface with a tiny bit of water or wipe the surface with a damp towel and try again. The slight bit of moisture should provide enough tacky traction for the dough to shape.
I'm providing 2 different ways to shape the bagels. Choose one or experiment with both... - PRE-SHAPING METHOD 1 - POKE & SPIN:
To pre-shape the dough, gently pat to deflate. Form each piece of dough into a loose ball by pulling the sides up and gathering it together in the center. Then pinch it together, almost like a dumpling. Turn it over so it's seam side down and create a C shape with your dominate hand around the dough ball. Start rolling your hand in small circles against the counter, with the dough ball rolling around inside your c shaped hand. After a few seconds it should start to build tension and roll into a tight, perfectly round dough ball. Set aside on a clean surface, seam side down, and cover with a clean, damp kitchen towel while you shape the rest. Allow the pre-shaped dough to rest for about 15 minutes. - BAGEL SHAPING METHOD 1 - POKE & SPIN:
Using your thumb, poke a hole through the center of the ball to create a donut shape. Holding the dough with both thumbs or your pointer fingers in the hole, spin the dough with your hands, gradually stretching it to create a hole about 2 inches in diameter. - Place each shaped bagel on the prepared sheet pan, then mist the tops lightly with spray oil or brush with a light coating of oil. Cover the entire baking sheet with plastic wrap and refrigerate at least 4 hours or up to 24 hours to age the dough. It will develop more character the longer it chills.
- PRE-SHAPING METHOD 2 - TUCK & ROLL:
To pre-shape the dough, gently pat the dough to deflate. Then fold the dough from the top 1/4 into the middle and press down at the same time to create surface tension on the new edge. Repeat the fold a few more times until a log form is shaped, pressing the edge to seal. Then gently roll the dough up and down between your hands until the dough starts to form a chubby little rugby ball shaped log and builds tension. Set aside on a clean surface, seam side down, and cover with a clean, damp kitchen towel while you shape the rest. Allow the pre-shaped dough to rest for about 15 minutes. - BAGEL SHAPING METHOD 2 - TUCK & ROLL:
Starting a the center, roll the dough back and forth while slowly extending your hands towards the ends of the dough, elongating the rope and tapering the ends. Repeat rolling until the rope is an even thickness about about 8" - 10" long.
Place one hand, palm side up a the end of rope. Grab the end of the dough in the palm of your hand and begin turning your hand over to wrap the rope around the back of your hand and complete the circle. The ends should overlap by about 2". Then seal the overlapping ends together by squeezing the dough in your hand. Press the seam into the work surface and roll it back and forth a few times to seal, creating a hole of about 2" in diameter. Gently squeeze the dough to even out the thickness if needed. - Place each shaped bagel on the prepared sheet pan, then mist the tops lightly with spray oil or brush with a light coating of oil. Cover the entire baking sheet with plastic wrap and refrigerate at least 4 hours or up to 24 hours to age the dough. It will develop more character the longer it chills.
POACHING THE BAGELS
- Remove the bagels from the refrigerator to proof at room temperature about 60 to 90 minutes before you plan to bake them.
To see whether the bagels are ready to bake, use the “Float Test” by placing one bagel in a small bowl of cold water. If it sinks and/or doesn’t float back to the surface, shake it off, return it to the baking sheet, and wait for another 15 to 20 minutes before testing it again.
When the bagels are ready, the bagel will pass the float test by rising to the surface. Hooray! They are ready to be boiled! If they pass the float test before you are ready to boil and bake them, return them to the refrigerator so they don’t overproof.
About 30 minutes before baking, preheat the oven to 500°F and gather and prep your garnishes (everything bagel seasoning, salt, salt and pepper, sesame seeds, salt and herb poppy seeds, etc.) - Fill a pot with 8-10 cups of water, just make sure the water is at least 4" deep. Cover, bring to a boil, then lower the heat to maintain a simmer. Stir in the date syrup (or barley malt syrup, honey or sugar), baking soda, and salt.
- Gently lower the bagels into the simmering poaching liquid. Add as many as will easily fit in the pot, I usually only add 2-3 at a time. They should all float to the surface within within a few seconds. After 1 minute, use a slotted spoon to turn each bagel over. Poach for another 30 to 60 seconds, then use the slotted spoon to transfer the bagels back to the baking sheet, with the domed side up, evenly spaced with at least 2" between them. I generally use 2 baking sheets, 4 bagels per sheet. (Be sure that the parchment paper is lightly oiled, or the paper will stick to the dough when the bagels.)
- Generously sprinkle on your toppings of choice as soon as the bagels come out of the water.
- Lower the oven temperature to 450°F, then transfer the baking sheet(s) to the oven.
- Bake for 8 minutes, then rotate the baking sheet(s). Bake for another 8 to 12 minutes, until the bagels are a deep golden brown.
- Allow bagels to cool on a wire rack for at least 30 minutes before slicing or serving up with loads of cream cheese!