Description
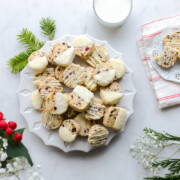
These Cherry Pistachio White Chocolate Shortbread Cookies are simple slice & bake cookies with buttery shortbread, studded with chopped green pistachios & chewy tart cherries. Once baked, dipped & drizzled in melted white chocolate with a glitzy sprinkle of sparkling sugar.
Ingredients
Units
Scale
CHERRY PISTACHIO WHITE CHOCOLATE SHORTBREAD COOKIES
- 2 1/4 cups all purpose flour
- 1 teaspoon fine sea salt
- 1 cup unsalted butter (- at room temperature)
- 2/3 cup granulated sugar
- 2 teaspoons almond extract
- 3/4 cup raw pistachios (- roughly chopped)
- 3/4 cup dried tart cherries (- roughly chopped)
- 6 ounces white chocolate
- 2-3 tablespoons Bob's Red Mill Sparkling Sugar (or demerara sugar)
Instructions
- Measure flour and salt into a mixing bowl and whisk together.
- With the paddle attachment on a stand mixer, cream together the butter and sugar on a medium high speed for about 5 minutes, until fluffy, airy and lighter in color. Be sure to stop your mixer and scrape down the sides of the bowl a few times so you are sure to incorporate all of the sugar into the butter.
- Add the almond extract and cream until blended.
- With the mixer on a low stir, slowly add the dry ingredients until just incorporated. Stir in the chopped pistachios and chopped dried cherries until mixed in.
- Turn out the dough onto a clean, lightly floured surface. Gently gather the dough together into a disk by gently patting, not kneading the dough, and pat to flatten the top. Once you have a round disk shape, use a knife or a bench knife to cut directly in half and set aside.
- Clean your work surface with a bench knife, then lay down a sheet of parchment paper. If you have a couple of empty paper towel rolls handy, have them available. Drop one of your dough halves on the parchment paper and use your hands to shape a rough log shape, roll into a smooth log until it is about 1 -1 1⁄2” in diameter (eyeball it to about the size of your empty paper towel roll).
- Wrap the parchment paper around your dough log, lengthwise. Then twist each end of the paper into pigtails in opposite directions (one towards you and one away from you) to form a locking mechanism. With each twist, the dough will compress and becomes smoothed out (think of it like a sausage in a casing). Roll from the center outward until you feel that you have a smooth, cylindrical log. Now you can get tricky (optionally) and stuff that dough log into an empty paper towel roll, it should be a snug fit but should slide in and out easily.
*The idea behind the paper towel roll is that your dough is going to hold its cylindrical shape while it chills instead of having a flat bottom. - For the second square log, gather your dough and pat it together into a rectangular shape, squaring off the edges. Press into the counter to square off the edges and turn the log 1/4 turn (instead of rolling) patting gently on the top to create an even surface. Keep rotating and patting until the log is about 1 -1 1⁄2” around and square. Wrap in parchment as you did with the round log.
- Refrigerate the dough for at least 1 hour, if not 2. This allows the dough to set up and hold its shape nicely when baking. *You can also freeze the dough at this point. Just remember to defrost it overnight in the fridge or at room temperature for about an hour before slicing and baking.
- Preheat oven to 325° F.
- Remove dough logs from the fridge and unroll on a cutting board. Using a sharp knife, slice the log into 1⁄4” - 1⁄2” thick cookies. You should get about 16-20 cookies per log. Arrange them on a Silpat mat or parchment paper lined baking sheet in a 3 x 4 pattern, evenly spaced.
- Bake for 18-22 minutes, rotating the pans halfway through the bake. They should come out with a golden ring around the edge and be firm to the touch with just a bit of give in the center.
Allow to cool either right on the trays or on a cooling rack. - Roughly chop the white chocolate bars. Using a double boiler (or using a heatproof bowl over a saucepan), melt the white chocolate chunks over just simmering water (not boiling), stirring occasionally until smooth.
- For the dip method - gently dip the cookies halfway into the melted white chocolate, at an angle, to coat. Set the cookies backside down, with the chocolate side facing up, on a baking sheet with a cooling rack to set. Sprinkle with sparkling sugar while the chocolate is still tacky.
- For the drizzle method - Place the cookies on a cooking rack and use the whisk to wave the melted white chocolate back and fourth over the cookies creating a messy drizzle. Sprinkle with sparkling sugar while the chocolate is still tacky.
- Let sit for an hour so the chocolate has time to set before serving.
Notes
This recipe if highly adaptable, feel free to make it your own by swapping in different nuts or dried fruit. You could also use dark or milk chocolate in place of white chocolate. Cranberry and hazelnut with dark chocolate would be really yummy.
- Prep Time: 30 minutes
- Cook Time: 20 minutes
- Category: Dessert
- Cuisine: Cookies