Description
This divine combination of pillowy soft, freshly made pita bread served warm with tangy, creamy and zesty tzatziki sauce will make you grateful for your Greek ancestors. This recipe for Pita Bread with Tzatziki Sauce can be prepared alone as a snack or enjoyed as a base to a gyro, falafel or hearty Greek salad.
Ingredients
Tzatziki Sauce
- 2 cups Greek yogurt
- 1 medium cucumber (- peeled and seeded)
- 2 heaping tablespoons fresh dill (- finely chopped)
- 1-2 cloves fresh garlic (- finely minced )
- 1/2 medium lemon (- freshly squeezed)
- 1 teaspoon fine sea salt
- 1/2 teaspoon black pepper
Pita Bread
- 2 3/4 cups all purpose flour
- 1 cup water
- 2 1/4 teaspoon active dry yeast (- 1 package)
- 2 teaspoons fine sea salt
- 1 1/2 teaspoons olive oil
- 1/2 teaspoon sesame oil (- optional, otherwise use olive oil)
Instructions
For the Tzatziki Sauce
- Begin by peeling, deseeding and grating 1 medium sized cucumber.
- Place the grated cucumber onto a cheesecloth or other thin (non-linty) dish towel and wrap and twist until the grated cucumber is fully wrapped. Gently squeeze the liquid from the wrapped cucumber until dry-ish. Set aside. (I like to reserve the cucumber juice and add it to water for a refreshing drink.)
- In a medium bowl; mix together yogurt, squeezed cucumber, lemon juice, dill, garlic, salt and pepper. Cover and refrigerate for the flavors to develop.
For the Pita Bread
- Warm the water up to 100° - 110°F, if water is too cold the yeast won't activate, if it's too hot the yeast will die. In the bowl of a stand mixer, mix the water and yeast together, and let sit for about 8-10 minutes until the yeast is dissolved and begins to bloom.
- Add 2 1/2 cups of the flour (saving the last 1/4 cup for adjustments), salt, olive oil and sesame oil (if you aren't using sesame oil, just substitute with olive oil).
- Using a stand mixer with a dough hook, knead the dough on a medium - medium/high speed for about 5-7 minutes until the dough becomes smooth and elastic. If the dough seems too sticky after kneading for a few minutes; add remaining flour, 1 tablespoon at a time. But add sparingly, you don't want to dry out the dough. Alternatively, knead the dough by hand on a smooth, clean surface for 7-10 minutes until smooth and elastic.
- Turn dough onto a smooth surface and shape into a round ball. Clean the mixing bowl and lightly oil with olive oil. Place the dough ball in the oiled bowl and roll it around in the bowl to coat lightly with oil. Cover with a clean dish towel or plastic wrap. Place in a warm area and allow the dough to rise, it should double in bulk after about and hour and may take up to two hours depending on how warm the room is.
At this point, you can refrigerate the pita dough until it is needed. The dough will keep refrigerated for about 5 days.
- Turn the dough out onto a very lightly floured work surface and gently deflate. Divide the dough into 8 equal pieces, I like using a kitchen scale for accuracy during this process but you can also eyeball it. Gently roll each piece into a ball and flatten into a thick disk. Lightly sprinkle the disks with a little more flour and cover them with a clean kitchen towel or plastic wrap until you're ready to cook them.
- Using a rolling pin, roll one of the dough disks into a circle 8" wide, about 1/4" thick. Lift and turn the dough frequently as your roll to to prevent the dough from sticking to the surface and to help keep the round shape. Sprinkle with a tiny bit of flour if it's starting to stick. If the dough starts to spring back, set it aside for a few minutes to rest, then continue rolling.
- Repeat with the other pieces of dough. Once you get into a rhythm, you can be cooking one pita while rolling the next one out.
- STOVETOP PITAS: Heat a cast iron skillet over medium-high heat until a few beads of water sizzle on contact. Drizzle a little oil in the pan and carefully wipe off the excess so it isn't greasy.
Carefully place a rolled-out pita on the skillet and cook for 30 seconds, until bubbles begin to form. Quickly flip the pita and cook for 1-2 minutes on the other side, until toasty, leopard-like spots appear on the underside. Flip again and cook for another 1-2 minutes to toast the other side. The pita should start to puff up at this point; if it doesn't, try pressing the surface of the pita gently with the back of a spatula or clean towel.
Keep cooked pitas covered with a clean dish towel while cooking any remaining pitas. Repeat until all pitas are cooked. - OVEN BAKED PITAS: Alternatively, you can bake the pita bread in the oven.
If you have a Baking Steel or baking stone, place it in the oven to heat. If you don't have a Baking Steel or baking stone, place a large baking sheet on the middle rack to heat.
While you're shaping the pitas, heat the oven to 450°F.
Carefully place the rolled-out pitas directly on the hot Baking Steel, baking stone or baking sheets (as many as you can fit at once), and bake for about 3 minutes. The pitas will start to puff up after a minute or two and are ready when they have fully ballooned up. It's so fun to watch!
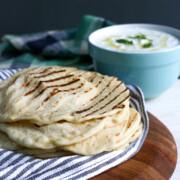
Cover the warm baked pitas with a clean dish towel while cooking any remaining pitas. - Serve warm pita bread with fresh and zesty tzatziki sauce.
Notes
Recipe adapted from The Kitchn - How To Make Pita Bread at Home.
Pitas are best when eaten immediately after cooking, for obvious reasons....yum! Leftover pitas can be stored in an airtight bag for a fews days and taste best when re-warmed in an oven. Baked pitas can also be frozen with wax or parchment paper between the layers for up to a few months.
Storing the Dough: Once it has risen, the pita dough can be kept refrigerated until you're ready to bake it. The dough will keep at this stage, refrigerated for about 5 days.
Pitas That Won't Puff: Sometimes you get pitas that won't puff, no big deal. The problem is usually that the skillet or oven isn't hot enough. Be sure the skillet is thoroughly hot or the oven is fully heated and the steel, stone or baking sheet is ripping hot before cooking. Even if the pitas don't puff, they still taste splendid.
- Prep Time: 2 hours
- Cook Time: 30 minutes