Description
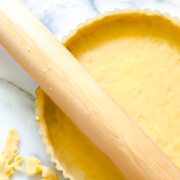
This easy Basic Tart Dough is crisp, rich, buttery & tastes like a sweet cookie. A versatile dough that's an ideal base for all kinds of tasty tart fillings, both sweet and savory.
Ingredients
Units
Scale
- 1 egg yolk
- 2 tablespoons heavy cream or whole milk
- 1 teaspoon pure vanilla extract
- 1 1/4 cup all purpose flour
- 1/3 cup granulated sugar, or powdered sugar or brown sugar
- 1/4 teaspoon fine sea salt
- 1/2 cup unsalted butter, cold and cut into 1/2" cubes
Instructions
MIXING BASIC TART DOUGH
- In a small bowl, whisk together the egg yolk, heavy cream and vanilla, then set aside.
- In a large mixing bowl, whisk together the flour, sugar and salt.
- Using a pastry cutter, 2 butter knives, cut the butter into the flour mixture until the texture looks like coarse cornmeal, the butter chunks shouldn't be larger than the size of peas. Alternatively, you can squish the butter into the dry ingredients with your hands. Just be sure to move fast so the butter doesn't' melt.
- Add the egg mixture and blend with a fork until the dough just pulls together. Alternatively, you can make the dough in a food processor by pulsing the butter with the dry ingredients in a food processor until the texture resembles coarse cornmeal, the butter chunks shouldn't be larger than the size of peas. Add the egg mixture and pulse a few times until the dough just starts pulling together into a ball.
- Transfer the dough to a lightly floured work surface, gather into a ball and pat to flatten into a disk. Wrap in plastic wrap and refrigerate at least 30 minutes, preferably an hour before rolling out. At this stage the dough may be frozen for up 3 months, if wrapped tightly.
ROLLING OUT BASIC TART DOUGH
- To roll out, place dough on a lightly floured surface and flatten the disk with a few taps of the rolling pin. Begin by rolling out the dough from the center outward, then lift the dough and give it a quarter turn. Repeat and continue rolling and rotating. Lightly dust the top of the dough with flour as needed. Roll out until the dough is about 1"-2" wider in diameter than your tart pan and about 1/8" thick.
- To transfer to the tart pan, roll the dough back around the rolling pin, then unroll it centered over the tart pan. To neatly finish the edges of the tart, simply roll the rolling pin along the top of the pan. This will remove the excess dough in a snap! Be sure to save that extra dough in case you need to fix any cracks after the tart shell bakes - see notes.
- Prick the bottom of the tart shell with fork to prevent the dough from puffing up as it bakes. Transfer to refrigerator or freezer to chill while the oven preheats.
BAKING THE TART SHELL
- Center rack in the oven and preheat oven to 375°F.
- Press crumpled parchment paper or foil tightly against the crust, covering the edges to prevent them from burning. Fill with pie weights, dried beans or uncooked rice, making sure they’re evenly distributed and fill the entire shell.
- Bake the crust for 20 minutes, until the foil no longer sticks to the dough and the edges start to look golden. Gently remove weights by lifting the parchment or foil from the pie shell and set aside.
- For a partially baked crust - bake for another 5 minutes without the weights until the the crust has a firm film on the top layer. If you are baking a tart with a baked filling, follow the tart recipe. You should be filling and baking at this point.
For a no-bake filling recipe, you need to fully bake the crust. So, bake for about 10 minutes longer until golden brown and dry. Transfer to a wire rack and let cool completely before filling.
Notes
- This recipe can be used for one 9 1/2" tart, one 14" x 4" rectangular tart or six 4" tartlets.
- Be sure to save your dough scraps for fixing cracks that occur during the baking process. Leftover dough can be used as spackle to seal the cracks, just apply a thin layer to fill the cracks and bake for a few additional minutes until it is set.
- I've had great success making a gluten free version of this Basic Tart Dough by swapping the All Purpose Flour for Bob's Red Mill 1 to 1 Gluten Free Baking Flour.
- Recipe adapted from the Williams Sonoma Basic Tart Dough recipe.
- Prep Time: 20 minutes
- Cook Time: 30 minutes
- Category: Dessert
- Cuisine: tart