Description
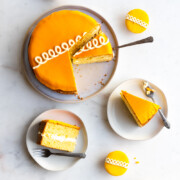
Inspired by the nostalgic cupcake, this Orange Cream Cake is a double layered delight. Fluffy meringue buttercream is sandwiched between orangey, yellow cake layers and topped with an orange white chocolate ganache featuring that signature swirl.
Ingredients
Units
Scale
ORANGE YELLOW CAKE
- 1 cup unsalted butter (- at room temperature)
- 2 cups granulated sugar
- 6 large eggs (- at room temperature)
- 1 large navel orange (- zested & juiced)
- 3 cups cake flour or pastry flour (- all purpose flour can be subbed in)
- 1 teaspoon fine sea salt
- 3/4 teaspoon baking soda
- 1 tablespoon pure vanilla extract
- 1 teaspoon orange extract
- 1 cup whole milk (- at room temperature)
MERINGUE BUTTERCREAM FILLING
- 3 egg whites (- reserved from eggs used in cake batter)
- 1 cup granulated sugar
- 1/2 cup unsalted butter (- softened but still slightly cold to the touch)
- 1 teaspoon pure vanilla extract
- 1/8 teaspoon salt
WHITE CHOCOLATE GANACHE ICING
- 1 cup white chocolate (- chopped into 1/4" chunks)
- 1/3 cup heavy cream
- 1/2 teaspoon orange extract
- orange food coloring (- natural powder or oil based)
Instructions
ORANGE YELLOW CAKE
- Begin by preparing two 9" round cake pans. Grease the cake pans with butter or non-stick spray, line the bottom of the pans with parchment paper, and grease the paper. Add a sprinkle of flour, then tap the pan lightly until the bottom and sides are evenly coated with a light layer of flour. Tap over the sink to remove any excess flour.
- Preheat oven to 350°F.
- Place a large sifter or a sieve in a large bowl. Add the flour, baking soda and salt, then sift together. Add the zest of the orange and whisk together. Set aside.
- Add the butter to the bowl of a stand mixer with the paddle attached, beat the butter on medium-high speed for about 2 minutes until creamy. With the mixer on a medium speed, slowly pour in the sugar. Then cream the butter and sugar together on medium-high speed for about 5 minutes, until the mix is light and fluffy.
- Separate 3 of the eggs by cracking the egg whites into one bowl and the yolks into another, careful not to get any yolk in with the whites. Set the 3 eggs whites aside for the meringue buttercream filling. Then add the remaining 3 full eggs to the egg yolks. Add the vanilla and orange extract to the egg yolk bowl.
- With the mixer still on medium-low speed, add the eggs, 1 at a time, allowing each egg to be fully incorporated into the batter before adding the next. You may need to scrape the sides and bottom of the bowl with a spatula a time or two.
- Add the fresh squeezed orange juice to the milk. With the mixer on a low speed, stir in the the dry ingredients followed by the milk and OJ mixture in 3 additions. Begin with 1/3 of the dry ingredients, stir until just combined, followed by the half of the milk mixture. Alternating two times, starting and ending with the dry ingredients. Mix until just combined and smooth. Don’t over-beat the batter. Scrape down the sides and bottom of the bowl with a spatula to make sure it’s well combined.
- Divide the batter into the prepared pans (a kitchen scale helps here) and smooth the top with a spatula. Bake in the center of the oven, on the same rack, for 30 to 35 minutes or until a wooden skewer inserted in the center comes out clean and the cake bounces back when lightly pressed.
- Remove the cakes from the oven and let them stand in the pans for 20 minutes. Run a butter knife between the cakes and the edge of the pan to keep from sticking. Gently invert the cakes to release from the pans and cool completely on a wire rack. Once they cakes have cooled down, it helps to stick them in the fridge to chill before slicing, this makes the slicing process a little easier.
- To achieve even layers and smooth top, you'll likely need to level the cake layers. If the cake has domed up, you'll need to even it out by slicing off the dome. One easy way is to place a slightly smaller plate inside the cake pan, boosting the cake up enough to cut off the dome and flatten out the cake. Use a serrated knife to cut through by gently resting the knife along the rim of the pan and using the pan as a guide. Carefully cut through the cake and use a side to side sawing motion to slice all the way through, until you have an even surface layer. Remove from the pan and place back on the wire rack. Repeat with the second layer. If you've accumulated a lot of crumbs, gently brush the top of the cake with a pastry brush to remove excess crumbs. Snack on those cake scraps, they are delish!
MERINGUE BUTTERCREAM FILLING
- Whisk the sugar into the reserved egg whites leftover from the cake batter. Use a double boiler or set a heatproof bowl over a saucepan filled with two inches of simmering water over medium heat. Careful to to let the bottom of the egg whites bowl touch the water.
- Whisk the egg whites and sugar constantly until the sugar dissolves and mixture has thinned out. This may take 4-5 minutes. It will thin out and become frothy white on top. You can test if it’s ready by quickly dipping your finger or a clean spatula in and rubbing the mixture between your fingers but be careful because it will be very hot! it should be smooth and silky with no sugar granules. You can also use a thermometer, the desired temperature should be right around 160°F.
- Immediately transfer the mixture to the bowl of a stand mixer fitted with a whisk attachment. With the mixer on a medium-high speed, beat until beat until soft peaks form, then beat on high until stiff peaks form. You'll know you've hit stiff peak stage when you have glossy peaks that stand straight up. This will likely take at least 10-15 minutes up to 20-ish minutes, if the weather is humid.
- Make sure the meringue and the bowl have cooled down before moving on to the butter stage. If it's really warm, stick the bowl (along with the meringue) in the fridge to cool down for a few minutes. You want it room temperature so you don't inadvertently melt the butter.
- Switch the stand mixer to the paddle attachment. The butter should be softened but still slightly cool to the touch. On a medium-high speed, add the butter 1 tablespoon at a time. Allow each addition of butter to fully mix in before adding the next. Once the butter has been added, turn the mixer down to medium-low speed and add the vanilla and salt. Beat on medium-high for about 1 more minute, until smooth and creamy.
FILL THE CAKE
- If you haven't already, remove the parchment rounds from the bottom of the cake layers. Place the bottom layer, cut side up on a cake plate or cake stand.
- Use a spatula to gently spoon the Meringue Buttercream Filling onto the center of the bottom layer. Then use an offset spatula to gently spread the filling in an even layer over the cake, leaving about 1/2" unfrosted along the perimeter.
- Place the top layer, cut side down, on top of the filling. Gently nestle it on and press down carefully until the cake looks level.
WHITE CHOCOLATE GANACHE ICING
- Add the chopped white chocolate to a heatproof bowl.
- Heat the heavy cream on the stovetop or in a heatproof bowl in the microwave for 45 seconds, just until it begins to bubble.
- Pour the heavy cream over the chopped white chocolate. Cover the bowl with a plate and allow the mixture to sit for 1-2 minutes. Whisk or stir the mixture until the chocolate and heavy cream are combined. If some bits of chocolate aren't fully melted, re-heat the mixture over a double boiler or in the microwave in 10 seconds intervals, whisk until smooth and creamy.
- Whisk in the orange extract until fully incorporated. Use a measuring cup to scoop out 1/4 cup and set aside for the swirl.
- Add in a few drops of food coloring to the bowl and whisk until smooth. Adding more until desired orange color is achieved.
- Allow the orange colored ganache to sit at room temperature for about 25-30 minutes. You want it to thicken up before adding it to the cake. But, it should still be pourable. You can test this by dipping in a spatula, the ganache should run off the spatula in a slightly stalled, smooth pour that ribbons and holds it shape for a few moments in the bowl without instantly spreading into itself. If it's too runny, it will run off the sides of your cake and if it's too thick, it won't spread. You want to find that Goldilocks sweet spot in between.
- Once you've got the right consistency going, gently and smoothly pour the orange ganache over the center of the cake, it should slowly and smoothly spread to towards the sides. The goal is to get it to spread just to the edges and maybe drip down the sides a bit. If it hasn't spread to edges on it own after a few minutes, you can encourage the spread by carefully lifting the entire cake, on the plate, and gently tilting it to get the spread happening. Rotating until the ganache nearly reaches the edges all the way around. Alternately, you can use an offset spatula to spread the ganache over the top, but you risk not getting that perfectly even, smooth spread. Either way, it's going taste great. If any air bubbles occur, use a toothpick or wooden skewer to poke then and smooth out the ganache.
- Allow the orange ganache to set for another 30-ish minutes, until a smooth and satiny eggshell finish starts to form.
- Once the orange has set. Add the signature swirl using the remaining white chocolate ganache. You'll want it thicker than the orange ganache so it doesn't spread and holds it shape. I've found it works great after sitting at room temperature for about an hour, which aligns perfectly with the setting of the orange ganache. It should be smooth and soft but not runny.
- Prepare a piping bag and coupler with a Round Cake Decorating Tip size #5. Pour the remaining white chocolate ganache into the piping bag.
- I can't stress this enough...PRACTICE YOUR SWIRLS! I developed this recipe so there is more than enough white chocolate ganache to practice with. Lay out a piece of parchment paper for a test canvas. Holding the bag upright, not at an angle, pipe a short row of loopy swirls. This will help you determine if the ganache is the right consistency and get you in the flow! The ganache should smoothly pipe out and hold its shape when piped without spreading. If it's still spreading, wait a few minutes before trying again. If it too thick, it may be hard to squeeze. If that happens, you'll need to rewarm the ganache in the microwave or over a double boiler, just slightly. A pain yes, but a necessary step.
Once the consistency feels right, pipe a couple more practice loops to get the hang of it. If you're worried about running out of ganache, you can alway use an offset spatula to scrape up the practice swirls and return the ganache back to the piping bag. - When you feel confident in your looping skills, give it a whirl and pipe that big fat signature swirl over the center of the cake. You've got this!
- Allow the ganache to set completely before serving. It may take up to another hour or longer. But it will be worth it. Serve with a smile and brighten everyone's day with a sunny slice of this cutie Orange Cream Cake that you made with your whole heart!
Notes
- This recipe may seem bulky but the details are key to the success of this cake. I suggest reading through the entire recipe a couple of times before you begin. Then take it step-by-step. You've got this!
- This cake can be stored at room temperate for up to 3 days or 5 days in the refrigerator.
- I adapted Sally's Baking Addiction's brilliant recipe for Perfect Swiss Meringue Buttercream for the filling.
- Category: Dessert
- Cuisine: cake