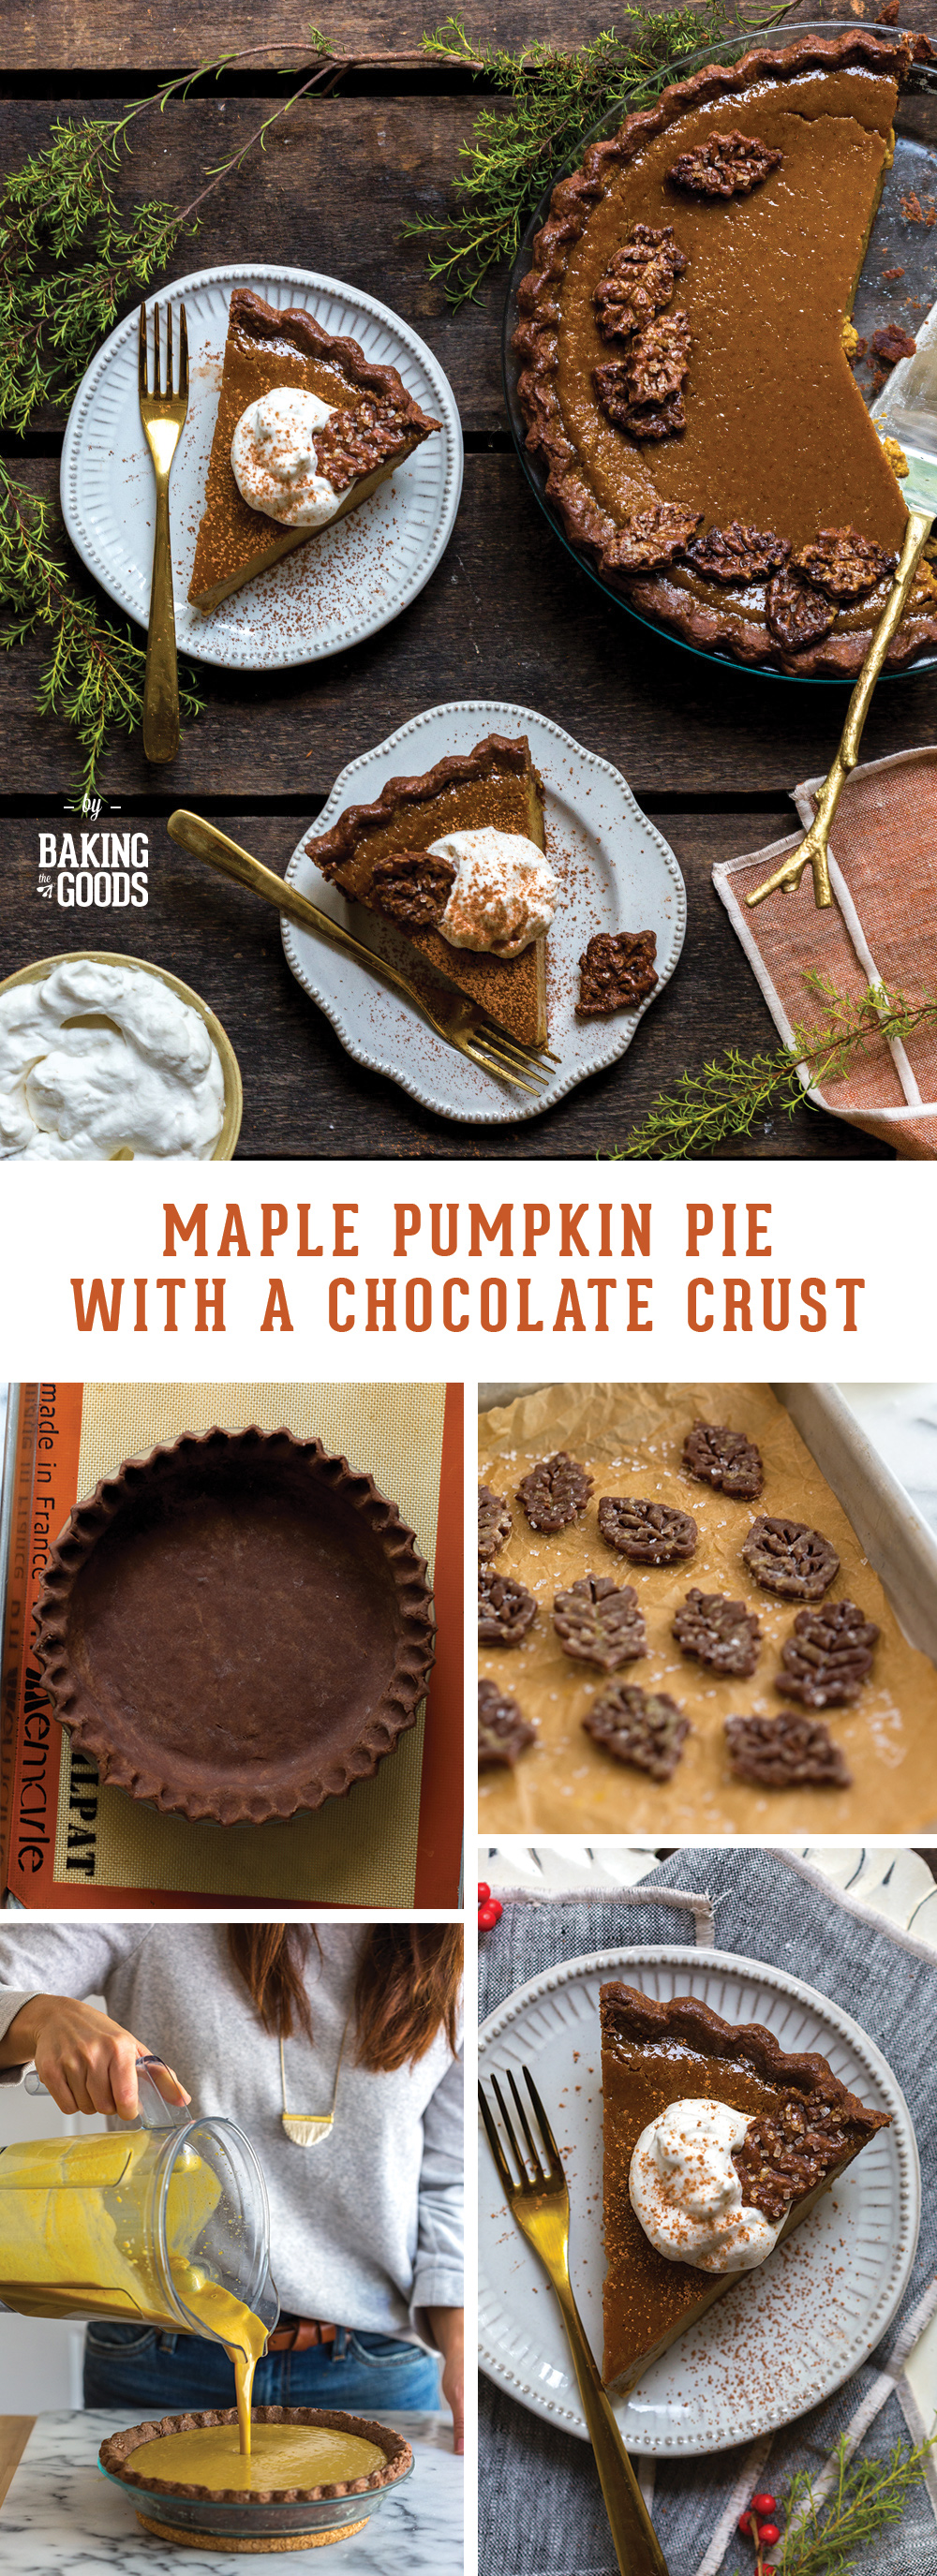
A delectable pumpkin pie recipe with a few tricks up its sleeve. This Maple Pumpkin Pie With A Chocolate Crust features an all butter chocolate pie crust surrounding smooth maple and pumpkin spiced filling. It's as airy & delicate as a soufflé with all of the classic pumpkin pie characteristics.

Jump to:
In my quest to come up with the best pumpkin pie recipe, I failed, hard, at least the first few tries. My friend Liza, @ill_have_what_shes_having on Instagram, recently made the most incredibly fluffy pumpkin mousse I've ever tasted. We paired it with my chewy Ginger Molasses Cookies for dippin'. Those two were so good together that I began to wonder if this combination was the entire reason that the world brought Liza and I together as friends in the first place.
Determined to make a pumpkin mousse pie with that filling from the moment I tasted it, I tried, and failed. Three times. I was ready to throw in the towel on this whole pumpkin pie recipe. Instead I realized I had to let the mousse go and be ok with the fact that this pumpkin mousse just belongs with the Ginger Molasses Cookies and not in a pie.
Back to the drawing board, I got to work again. This time focusing on a more classic pumpkin pie but with a some small but impactful changes. This Maple Pumpkin Pie With A Chocolate Crust is my answer to my years long quest to come up with a pumpkin pie recipe worthy of sharing with you all.
Start with a Chocolate Pie Crust
For this Maple Pumpkin Pie With A Chocolate Crust, I took crust inspiration from my hit recipe for Chocolate Hazelnut Maple Bourbon Pie. Both recipes use my Chocolate Pie Dough recipe as a base. Adding a bit more personality in flavor and color to these pies. In this pie dough, I added a bit of cinnamon to the chocolate pie crust, bringing in notes of warm hot cocoa to the crust.
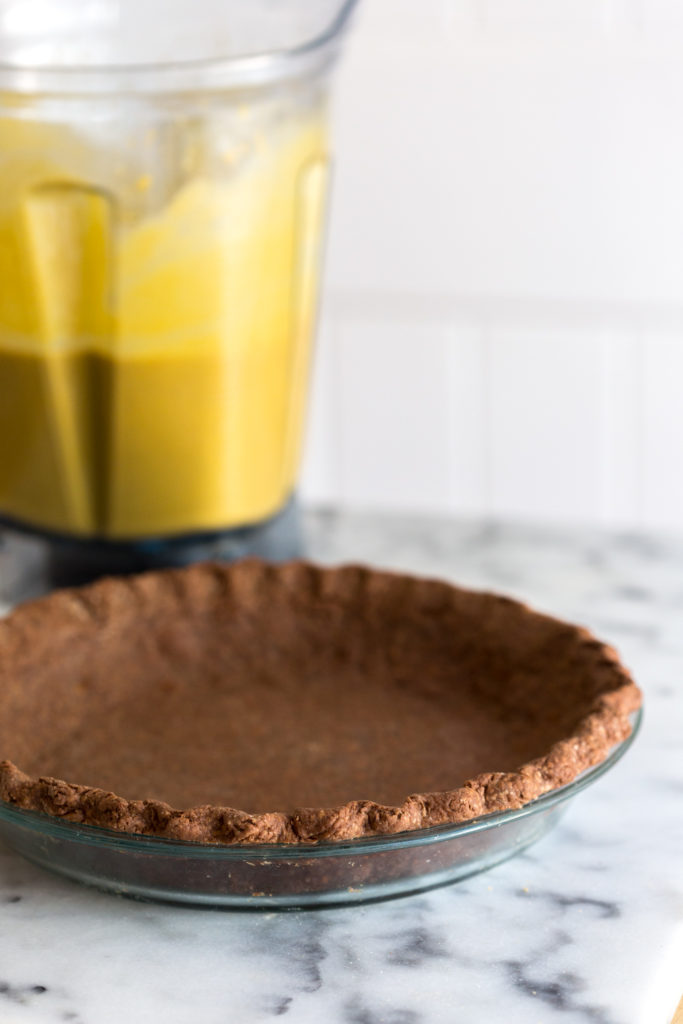
How to par-bake a chocolate pie shell
Since this is a single crust pie, the Chocolate Pie Crust needs to first be par-baked. To par-bake a pie shell is to partially bake a pie shell. Meaning, you partially bake the chocolate pie shell alone, before it's filled. Then once the shell has been filled, the pie shell will continue to bake along with the filling.
By par-baking first, the chocolate pie shell will maintain its signature shape and crimped edge by setting up before it's filled. Par-baking also fights pie crust slouch and soggy bottoms. Don't let it stress you out. Between the recipe instructions for this Maple Pumpkin Pie With A Chocolate Crust and the easy step-by-step instructions on the Chocolate Pie Dough post, I walk you through the whole process. It's easier than you think. I promise.
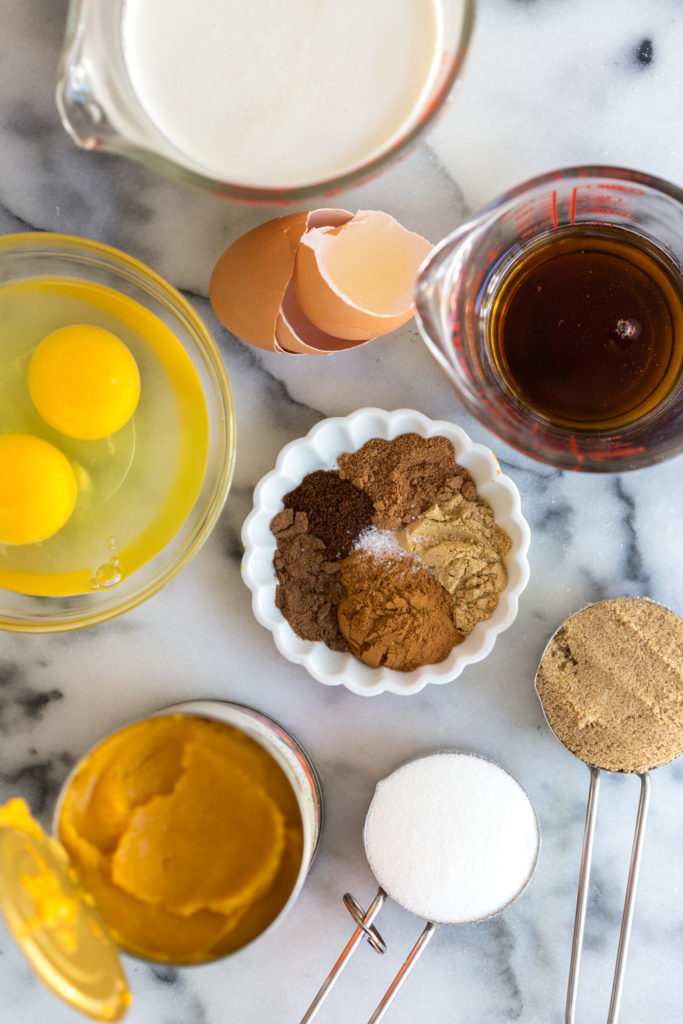
Pumpkin pie filling ingredients
- Canned pumpkin puree. I am a big believer in the simplicity of canned pumpkin puree. Sure, you could roast your own and make it a whole affair. But I lean on building up the flavors and imploring smart techniques to zhuzh up the canned stuff.
- Half & Half. A rich and creamy addition that makes the filling extra creamy and luxurious.
- Maple Syrup. This is one of my power moves. Instead of sweetening the pumpkin pie filling with a ton of sugar, I like to sub in maple syrup for some of the sugar. This rounds out the sweetness with mellow, rich maple flavor.
- Eggs. Custardy richness is key for a delicious pumpkin pie recipe. The eggs help set the pumpkin filling for luxurious, creaminess.
- Granulated sugar and brown sugar. Using a combination of the 2 sugars gives sweet depth and stability to the pie filling. But we dial back the amount and allow the maple syrup to really shine in this Maple Pumpkin Pie filing.
- Pumpkin spices. This airy pumpkin pie filling uses a blend of cinnamon, nutmeg, ginger and cloves. Heavy on the cinnamon, like I like it. However, you can absolutely sub in a store bought pumpkin pie spice here if you'd prefer.
Other than the brilliant addition of maple syrup, the ingredients are basic in this pumpkin pie filling. What matters most here is technique. This recipe has a cheeky little trick that transforms the pumpkin pie filling from basic to delectable.
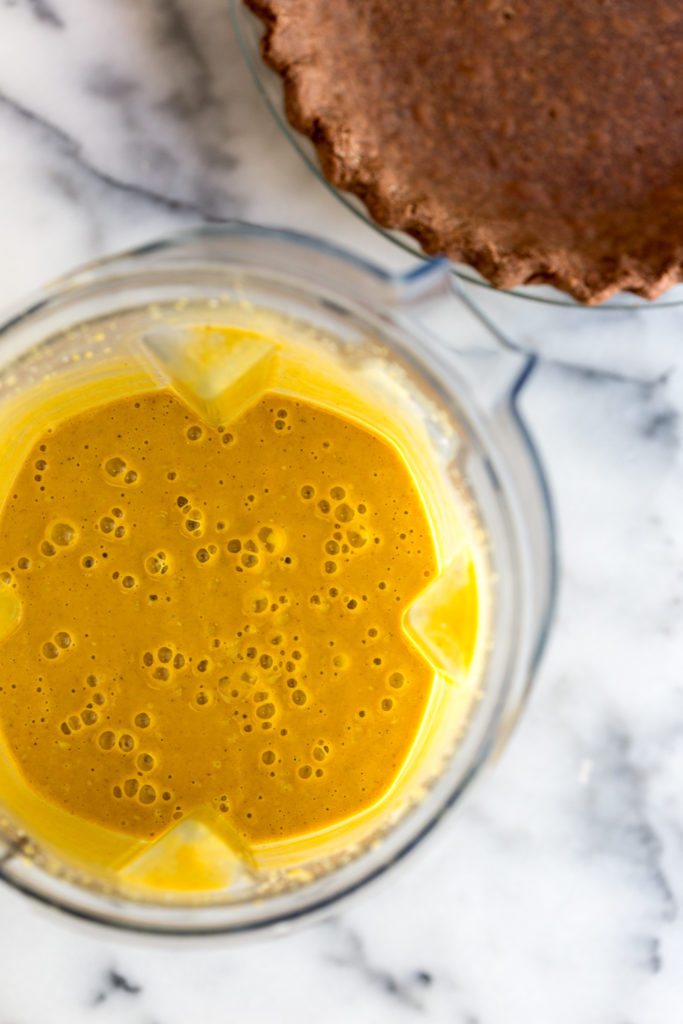
Whiz the pumpkin filling in a blender for an ultra airy, soufflé-like texture
The real magic comes from the mixing. As I started to whisk the ingredients together, I remembered a tip that I learned years ago for making quiche. If you whizz the shizz out of the filling in a blender
 , it comes out as light and fluffy as a soufflé.
So, I poured this pumpkin pie filling into the blender and whizzed it up real good for a few minutes. This Maple Pumpkin Pie filling baked up as the airiest, most delicate pumpkin pie filling I've ever had in my life. If I didn't know any better, I'd swear it was actually pumpkin mousse, just what I was going for in the first place!
Blend the pumpkin pie filling
By simply blending the pumpkin pie filling in a blender, you are ensuring a pie filling that's as airy as a cloud. It truly is key to the creamiest, dreamiest pumpkin pies. Even if you don't use my Maple Pumpkin Pie With A Chocolate Crust recipe, try blending your filling for your favorite pumpkin pie recipe. It is a game changer.
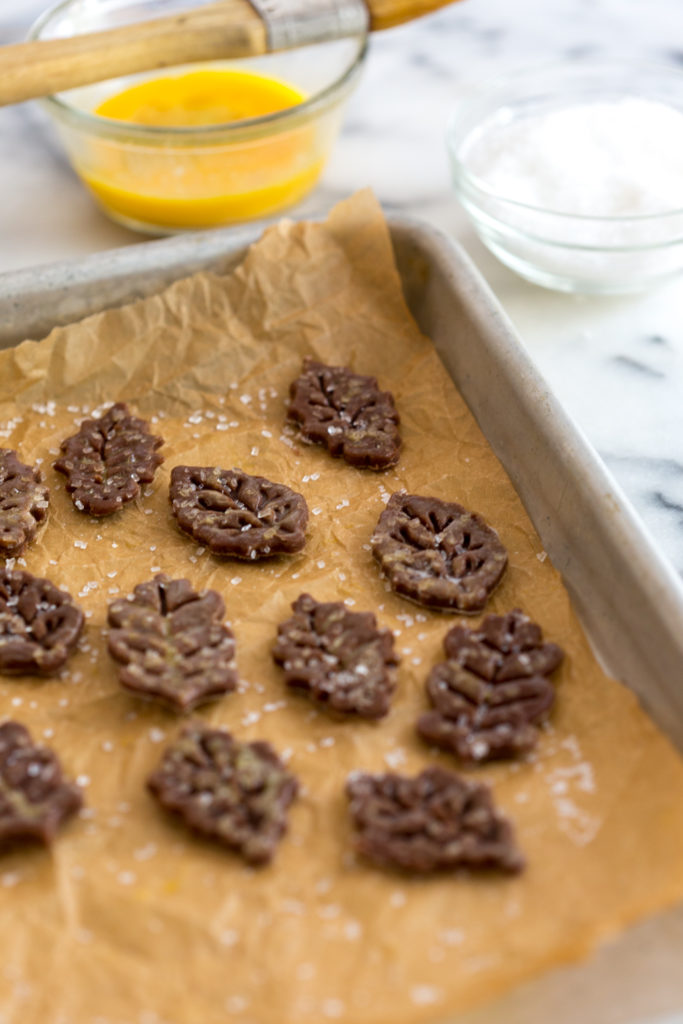
Save those pie dough scraps
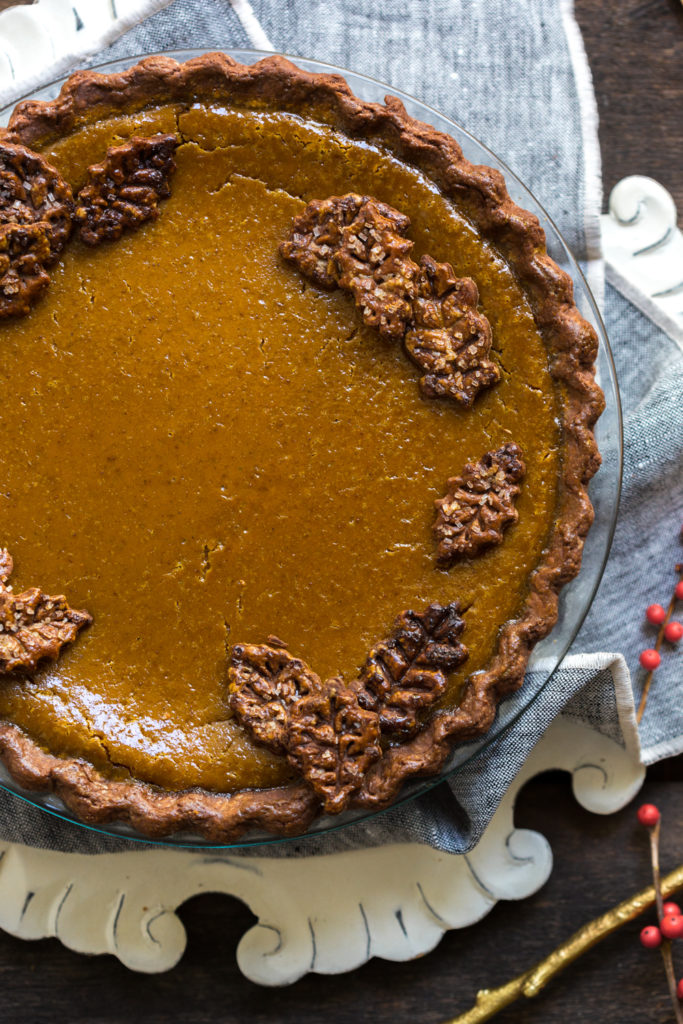
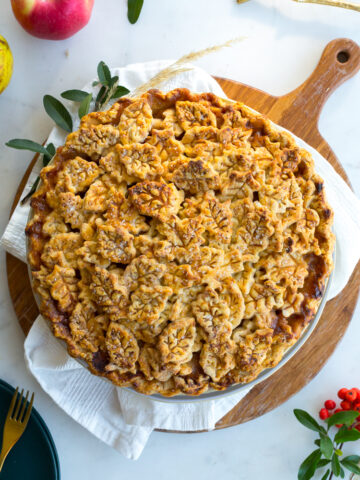
Another tip I always stress is save those pie dough scraps! When you trim the extra pie dough from your pie shell, gather those scraps together, roll them out and cut them into decorative shapes. I've been using my set of pie leaf cutters for years to add extra flair to my pies.
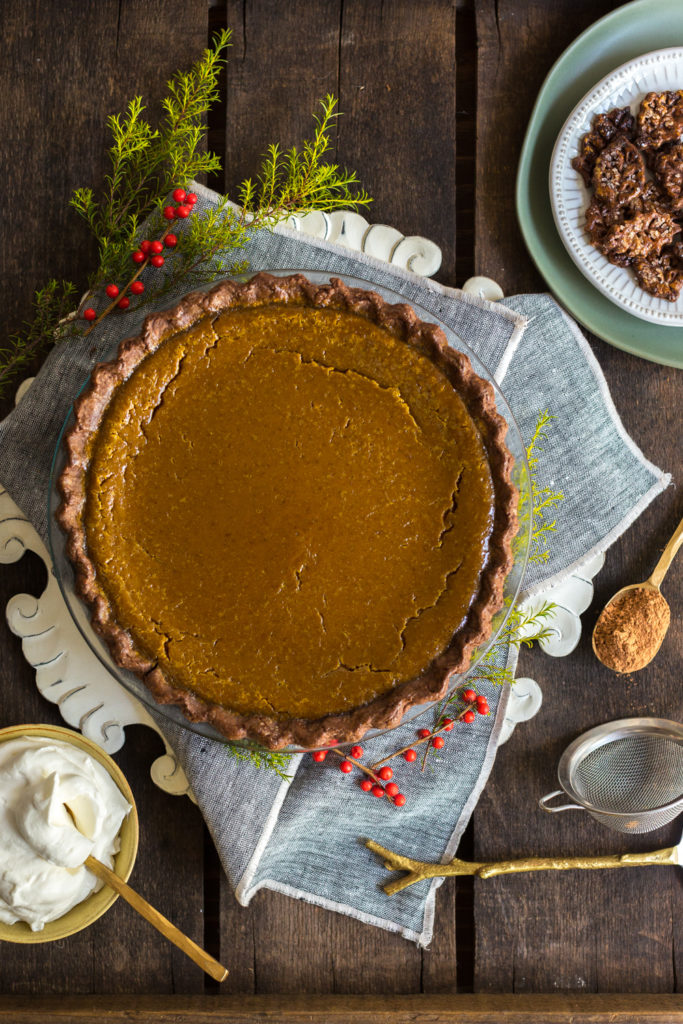
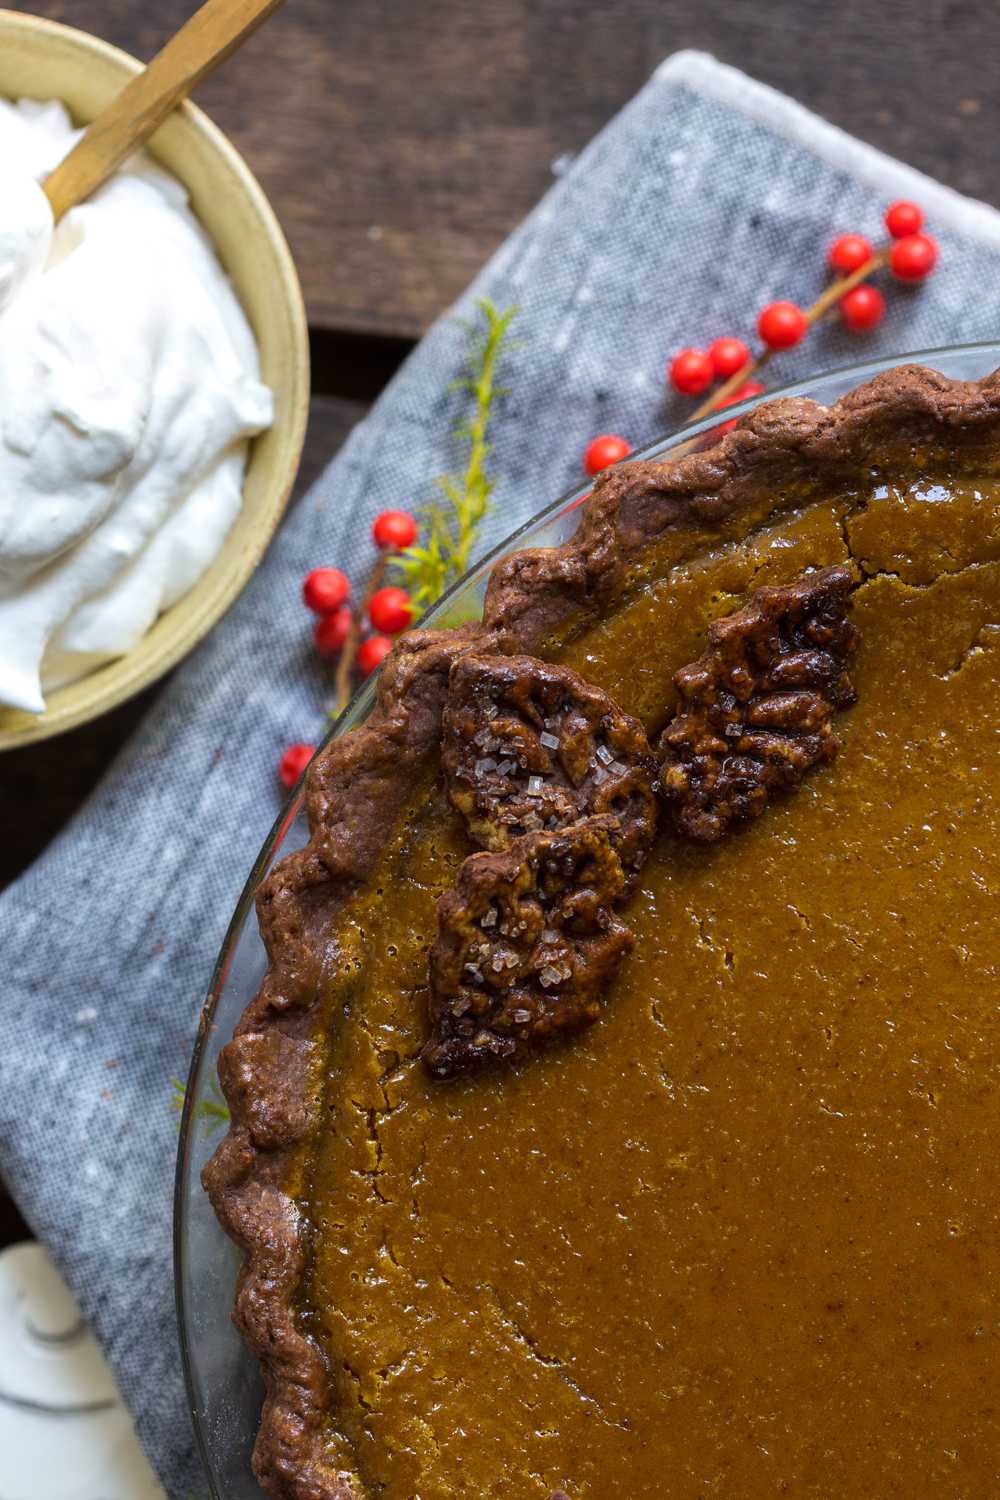
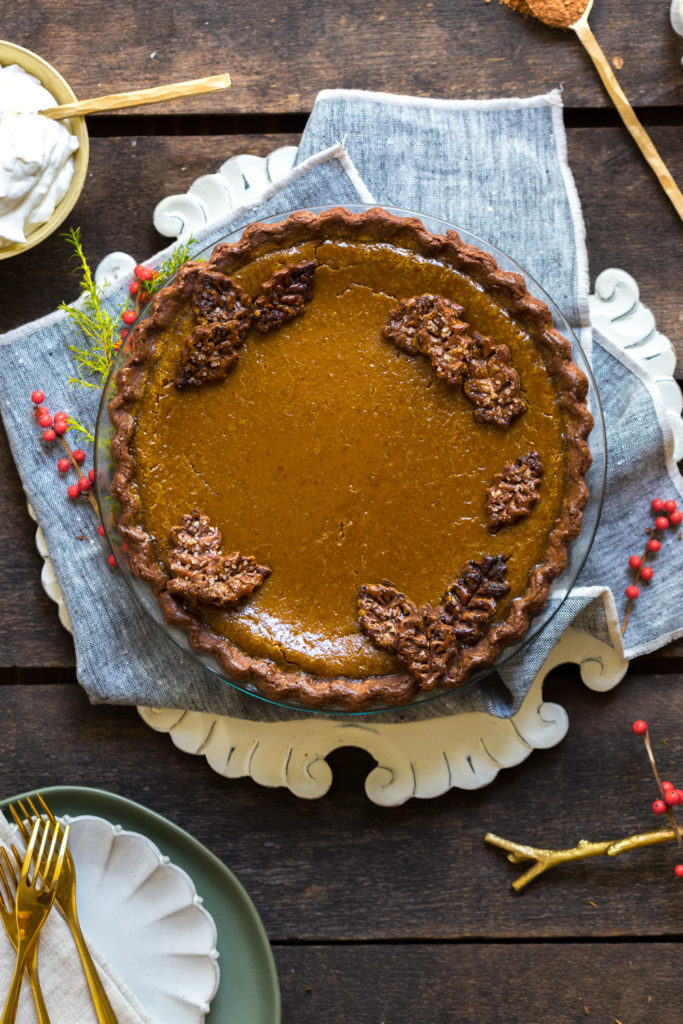
Use decorative pie crust leaves to cover up any cracks in your pumpkin pie
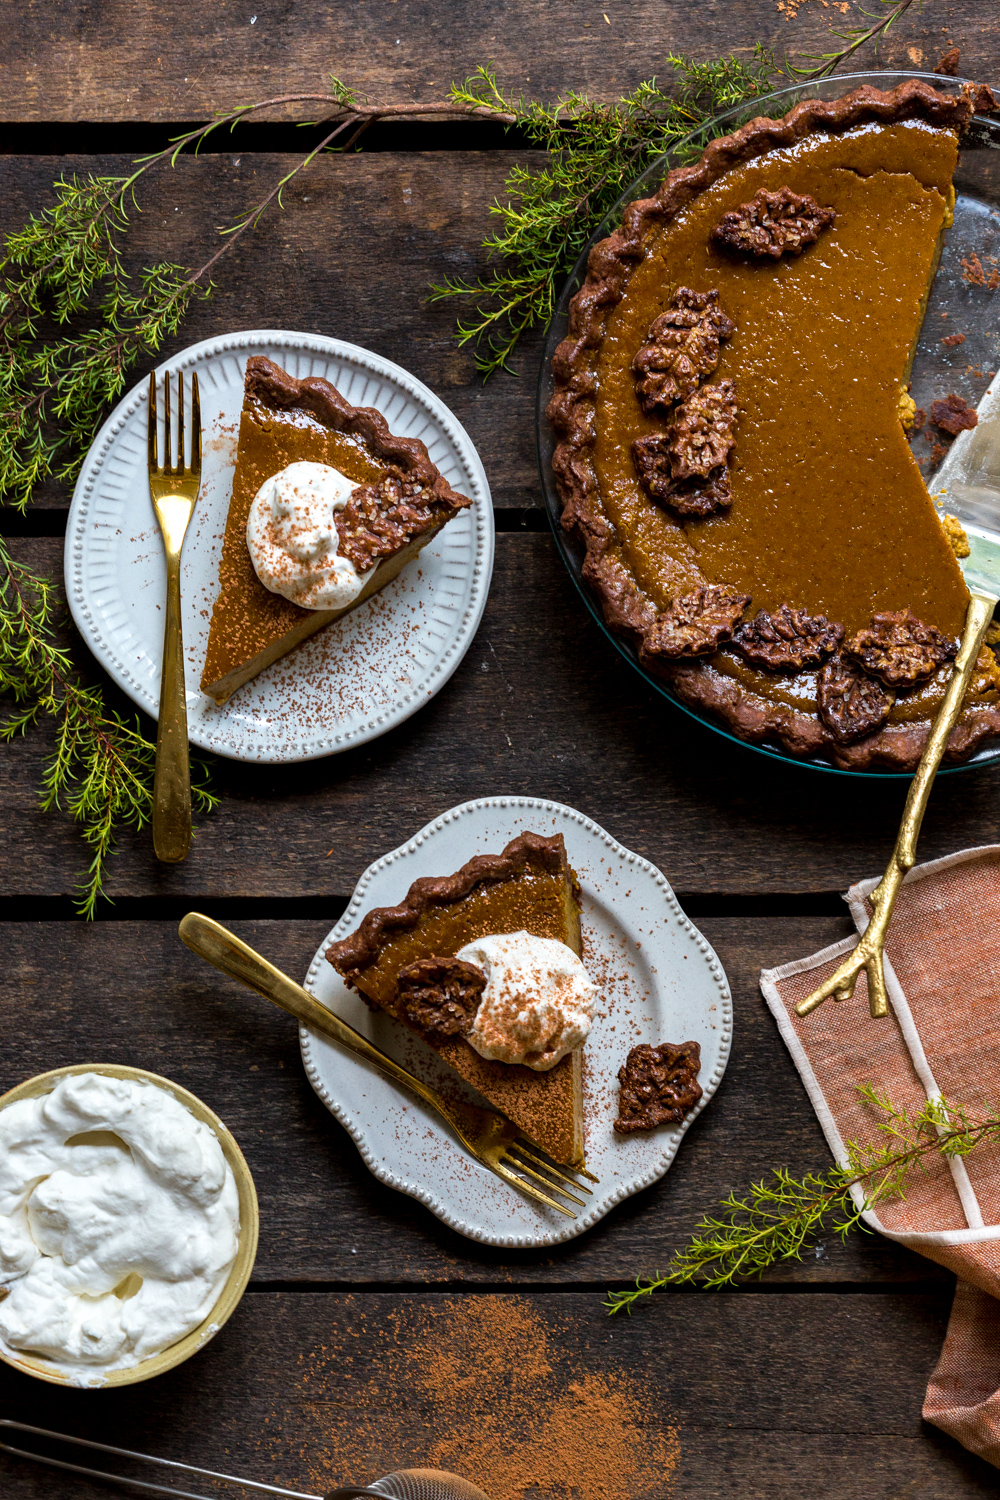
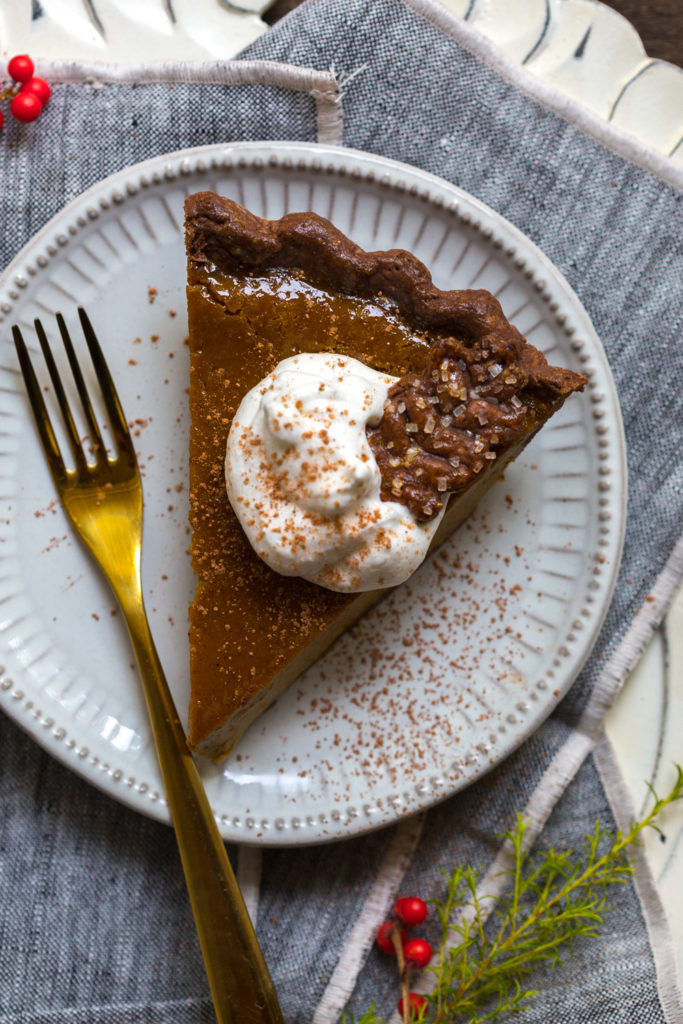
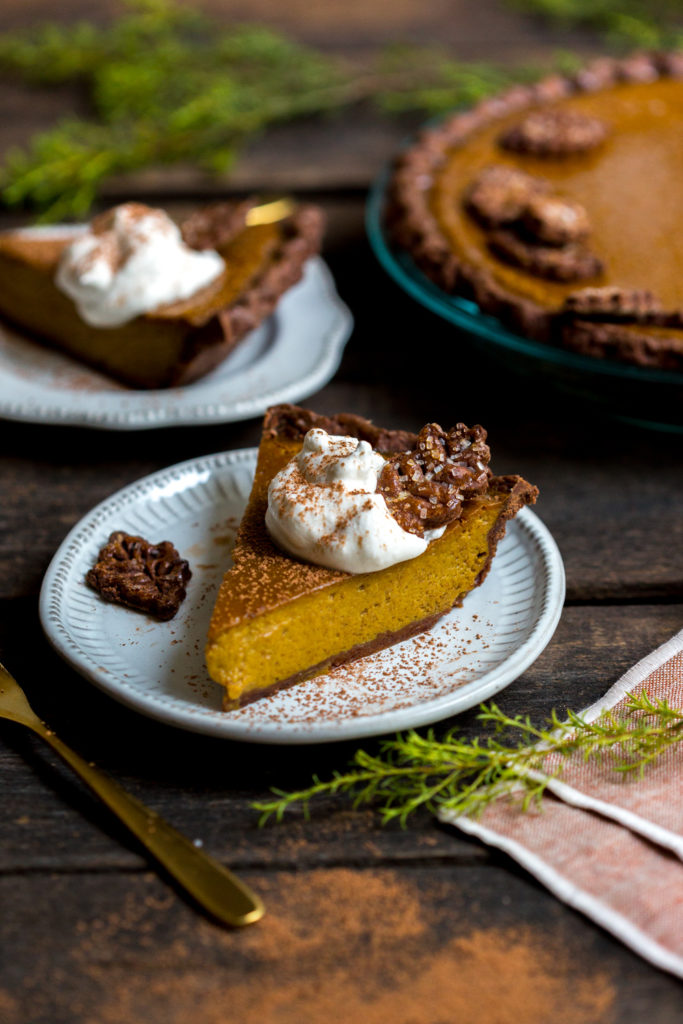
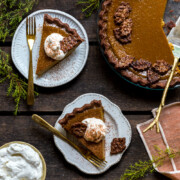
For this Maple Pumpkin Pie With A Chocolate Crust, I bake the pie dough leaves separately and use them to cover any cracks that pop up when I bake my pie. Brilliant, right? Then serve it with bourbon infused whipped cream to cover any additional cracks. Because bourbon whipped cream. Yum! It's a win win.
While this Maple Pumpkin Pie With A Chocolate Crust may not have been what I originally envisioned, it turned out to be the best pumpkin pie I've ever had. And to think, I almost gave up. Not all fails end in failure.
Pumpkin pie has never been prettier
Recipe
Maple Pumpkin Pie with a Chocolate Crust
- Total Time: 1 hour 45 minutes
- Yield: 8 slices 1x
Description
Flaky, all butter chocolate pie crust holds a smooth pumpkin spiced filling that's as airy & delicate as a soufflé. It's topped with decorative pie crust leaves & fresh bourbon whipped cream.
Ingredients
CHOCOLATE PIE CRUST
- ½ cup unsalted butter, cold & cut into ¼" cubes
- 1 cup + 2 TB all purpose flour
- 2 tablespoons dark cocoa powder, sifted
- 2 tablespoons granulated sugar
- ½ teaspoon fine sea salt
- ½ teaspoon ground cinnamon
- 2 tablespoons ice cold vodka
- 1-2 tablespoons ice cold water
- 1 large egg, at room temperature
- 1 tablespoon sparkling sugar, optional
MAPLE PUMPKIN PIE FILLING
- 1 - 15 ounce can of pumpkin puree
- 1 ½ cups half & half
- ¼ cup maple syrup
- 2 large eggs (- at room temperature)
- ¼ cup granulated sugar
- ¼ cup brown sugar
- 1 ½ teaspoons ground cinnamon
- ½ teaspoon ground ginger
- ½ teaspoon ground nutmeg
- ¼ teaspoon ground cloves
- a pinch of fine sea salt
BOURBON WHIPPED CREAM - optional
- 1 cup heavy whipping cream
- 2 tablespoons granulated sugar
- 1 tablespoon bourbon
Instructions
CHOCOLATE PIE CRUST
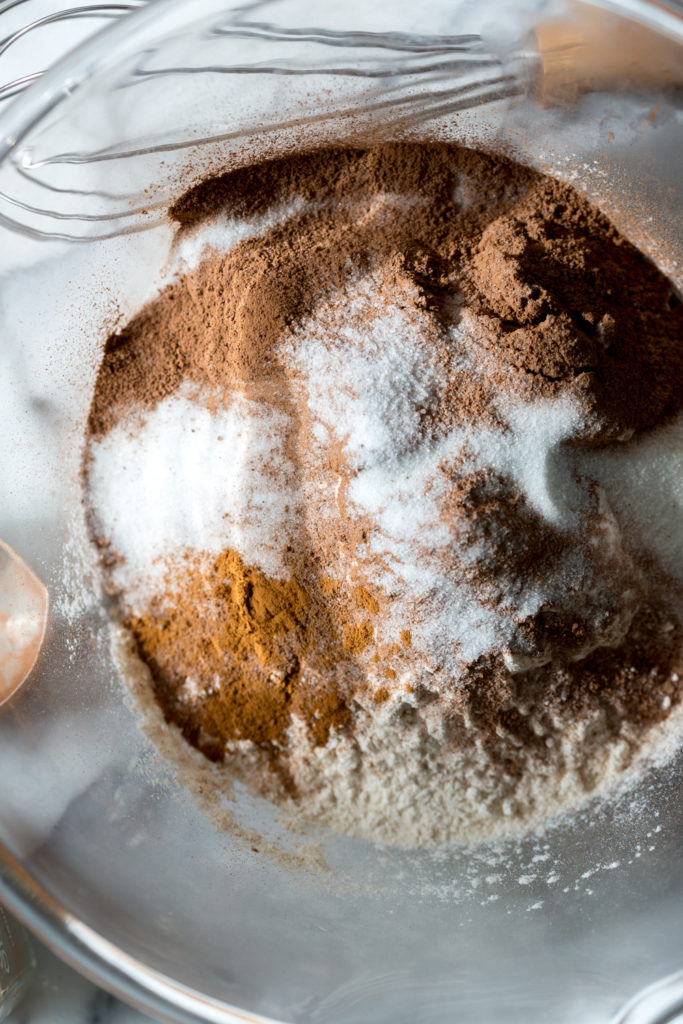
Place the flour, sifted cocoa powder, sugar, cinnamon and salt in a large mixing bowl and whisk together.
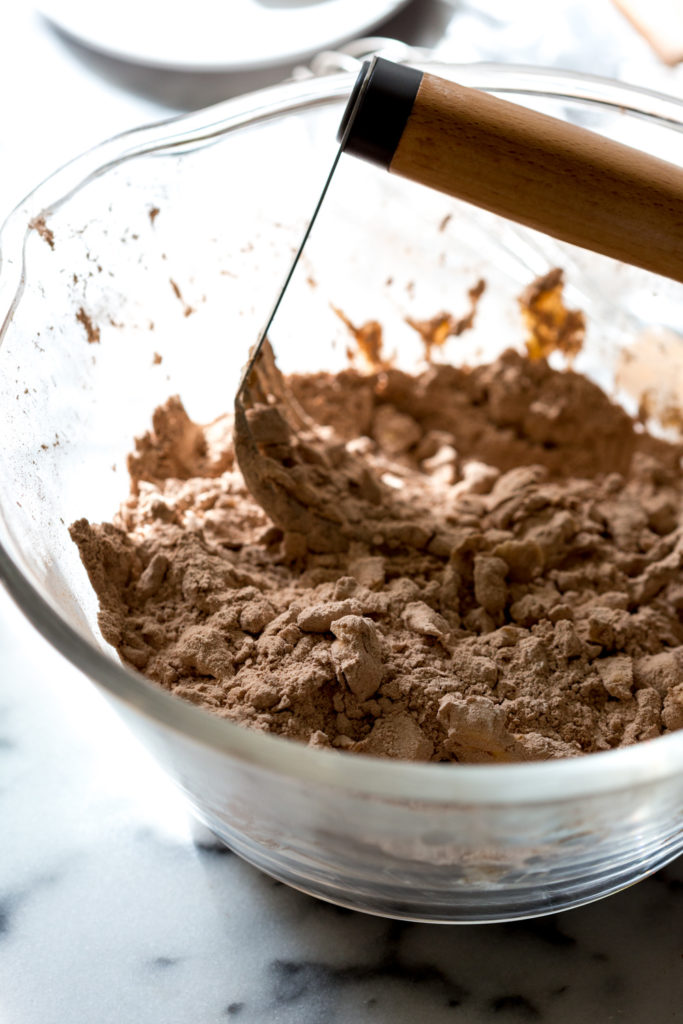
Cut in the cubed butter into the dry using either a pastry blender, two butter knives or by squishing it between your fingers, just be careful that the butter doesn't start to melt. Keep mixing the butter into the dry ingredients until mealy, pea sized granules form. *If using a food processor, place the flour mixture and cubed butter in the food processor. Gently pulse until the flour changes from silky to mealy; this should only take a handful of pulses so watch it carefully.
Use a pastry blender or fork to hydrate the mix with the ice cold vodka or water, adding 1 tablespoon at a time and mixing as you go. The dough should just start to combine, try not to over-hydrate. *If using a food processor, while pulsing, gently pour the vodka through the feed tube just until combined. Check the hydration level of the dough by gathering a small fistful; if it holds together, it’s ready. If it is still dry or crumbly, slowly add ice cold water, 1 tablespoon at a time, using a pastry blender or fork until sufficiently hydrated.
Form the dough into a disk. The dough will come together without much effort or deliberate packing. Wrap the dough disk tightly in plastic wrap or place in sealing, reusable bags. Chill the dough disk for at least 1-2 hours before rolling and forming. *If you don't plan on using the dough on the day you prepare it, you can store the dough in the freezer, tightly wrapped for up to 3 months.
Remove the dough disk from the refrigerator. On a lightly floured surface, roll out into a 12" round about ⅛" thick using a rolling pin.
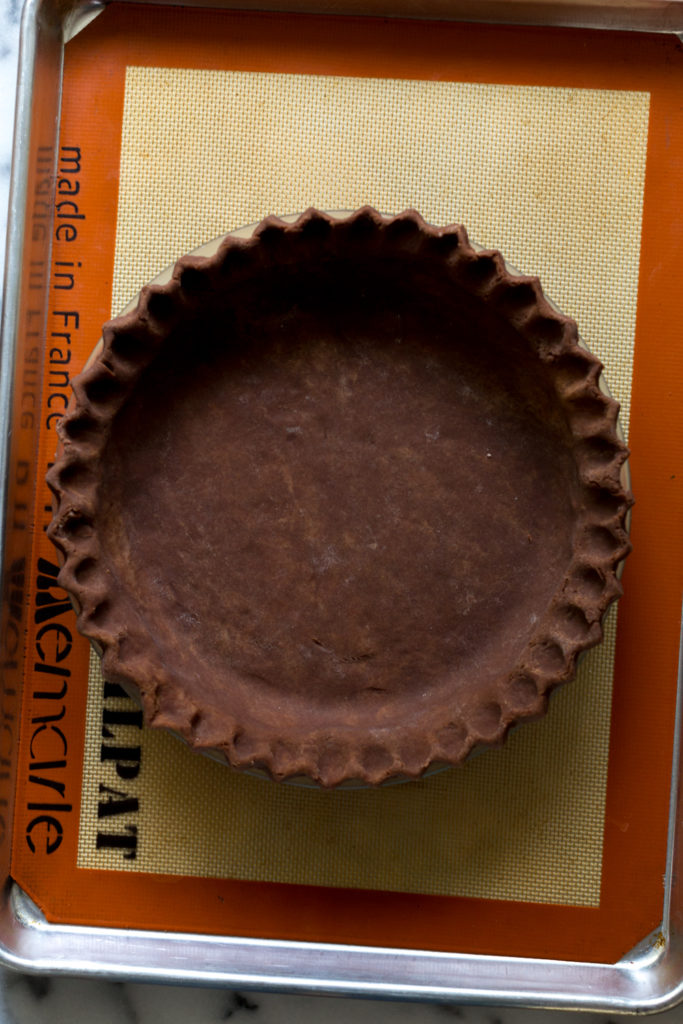
Gently transfer the rolled dough into a 9" pan. Trim the excess dough, leaving a 1"-2" overhang all the way around. Tuck the edge underneath itself to form a ring around the edge of the pie plate.
Flute the edges by pinching the dough between your thumb and pointer finger on one hand and your pointer finger knuckle on the other. Use a fork to prick small holes into the bottom of the pie shell. Place the pie shell in the freezer and chill for at least 20 minutes.
*Don't waste the scraps, gather them together and re-roll, then cut fancy leaf stamps or desired shape. Place on a lined baking sheet in the freezer until ready to bake.
Par-Baking the Pie Shell
Preheat oven to 425° F.
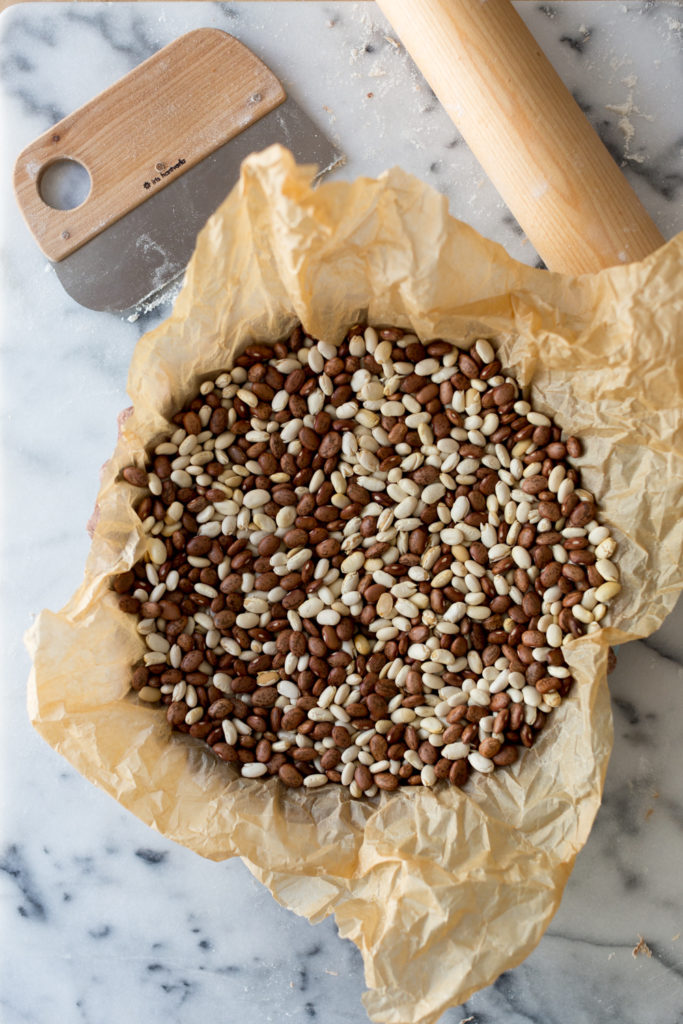
Place the frozen pie shell on a baking sheet and line the shell with a layer of parchment paper or aluminum foil. Fill the lined shell with beans, pie weights or rice. Be sure the weights fill the entire shell and reach to the edges and up the sides.
Bake with weights for about 15-17 minutes, until the crust barely begins to turn a deeper chocolate color and starts to look dry around the edges. Carefully lift and remove the lining and weights. Bake the empty pie shell for another 3-5 minutes, until the bottom of the shell looks dry. Allow to cool on a rack.
If you have dough scraps and plan to add leaves, lightly beat the egg for egg wash. Gently brush the leaves with the egg wash and sprinkle with turbinado sugar. Bake on a lined baking sheet alongside the pie shell, until the leaves are crisp and a deep brown color, 10-15 minutes.
MAPLE PUMPKIN PIE FILLING
Set oven to 325°F.
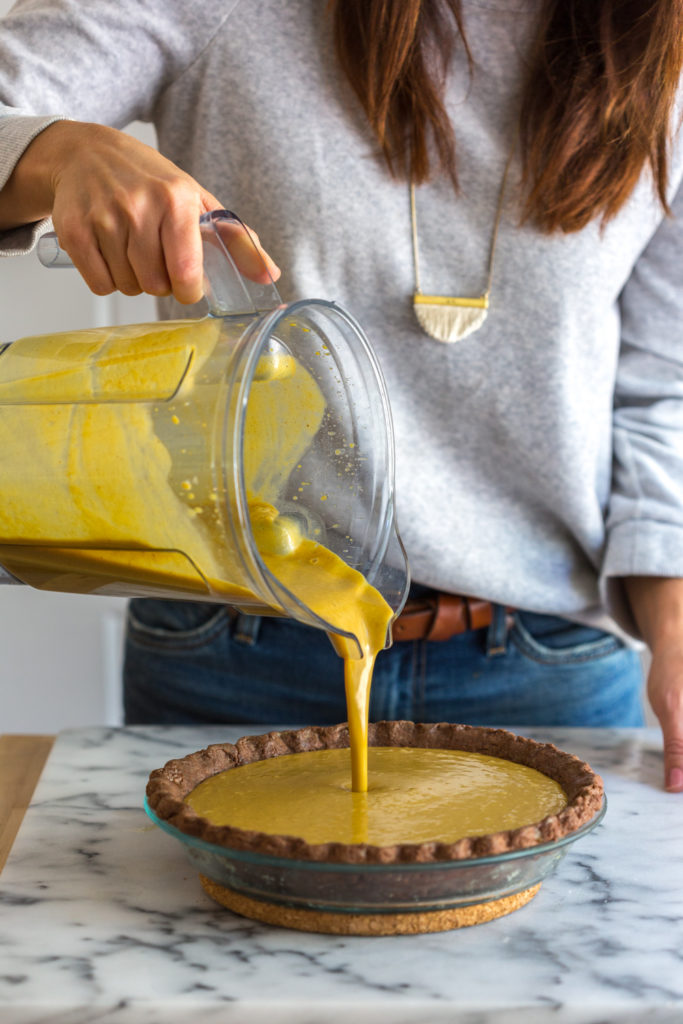
Combine all of the ingredients together in a blender and blend on a medium-high speed for 3-4 minutes until the mixture is super smooth and airy.
Place the cooled pie shell on a lined baking sheet (preferably lined with a silpat mat to keep if from sliding around on the pan). With the remaining egg wash, gently brush the bottom, sides and fluted edges of the par-baked pie shell with the egg wash.
Gently pour the blended pumpkin pie filling into the shell and carefully transfer to the center rack of the oven. Bake for 30 minutes and then lower the temperature to 300°F. Bake for 30-35 minutes more, until the filling is set and the top of the pie has begun to caramelize. It should still jiggle a bit in the center when you remove if from the oven.
Allow the pie to cool completely at room temperature then gently top with the baked pie crust leaves to decorate the top.
BOURBON WHIPPED CREAM - optional
- Place a metal mixing bowl and metal whisk into the freezer and chill for 15 minutes.
- Pour the whipping cream and sugar into the chilled mixing bowl. Whisk, slowing pouring in the bourbon, just until the cream reaches stiff peaks, around 3-5 minutes. When you take the whisk out of the cream, the peaks should hold firmly but have soft tips. Stop whisking before the cream turns grainy.
- Store in the refrigerator until you're ready to serve atop the pie.
Notes
Store the cooled pie in the refrigerator until you are ready to serve.
To serve, top with fresh whipped cream and a light sprinkle of cocoa powder and cinnamon.
Get my Chocolate Pie Dough for making 2 dough disks.
- Prep Time: 30 minutes
- Cook Time: 1 hour 15 minutes
- Category: Dessert
- Cuisine: pie
Lauren says
This is a question about printing recipes from your site. Lately recipes from your site print so faintly that the writing is crazy hard to see. Like it's printing a shadow. I don't have this problem with other sites, so I am wondering if you have any idea why this would be happening? Thank you!
dayn says
Hmm, that's interesting - I am sorry to hear you're having trouble. I'm not having any issues on my end. May I ask if you are using the print button on the recipe? Are you using a Mac or PC? Which browser are you using - Chrome, Firefox, Safari, etc? I wonder if in the printer settings, you may not have the Background Graphics box selected? Could it be that? Thanks so much for letting me know!