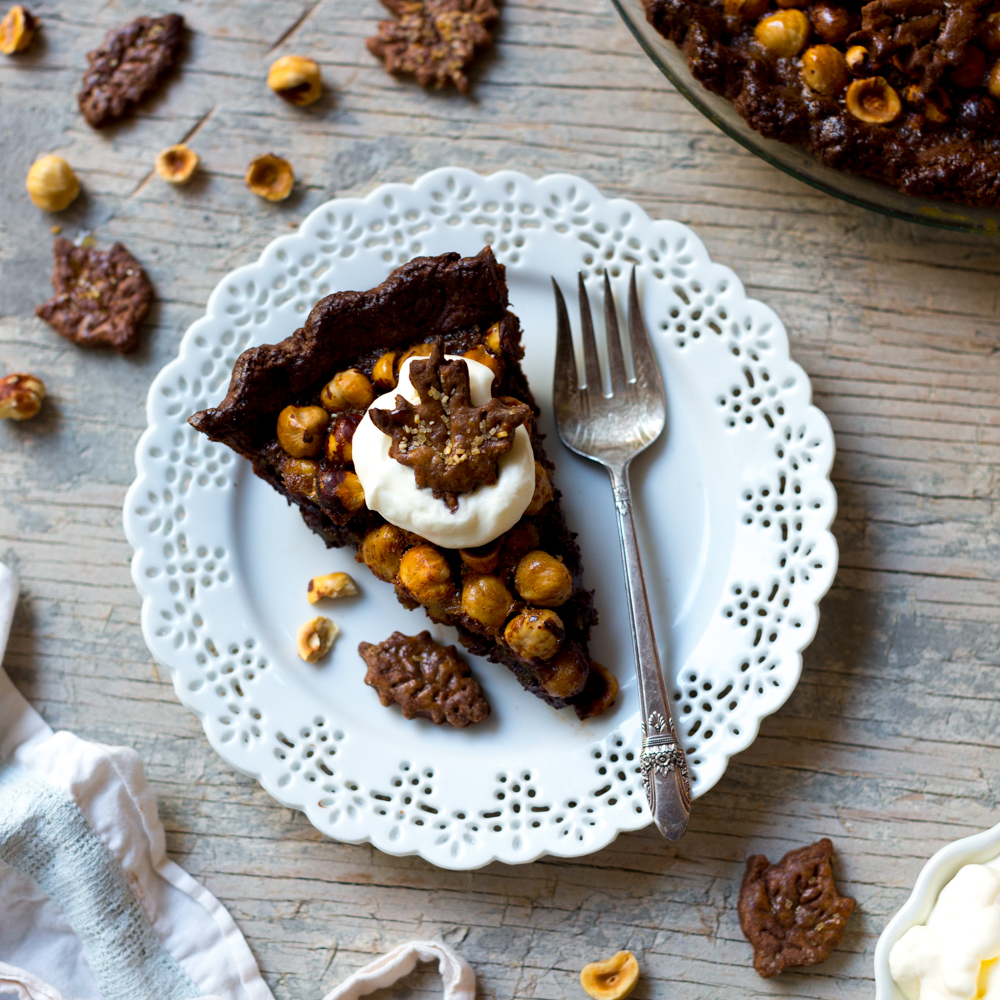
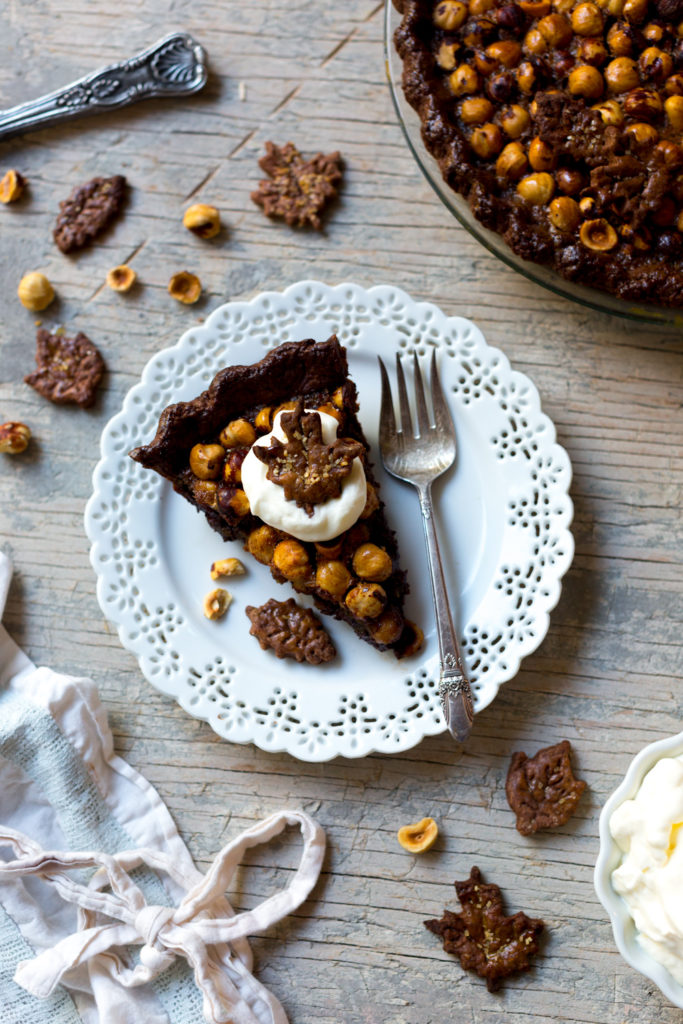
This Chocolate Hazelnut Maple Bourbon Pie has a deep chocolate all butter crust, smooth & melty dark with crunchy, toasted hazelnut in a rich maple bourbon custard.
Jump to:
The dream of this Chocolate Hazelnut Maple Bourbon Pie floated around in my mind for years before finally becoming a reality. When I was finally able to fully develop this pie recipe, after a few iterations, it came out even better than I had imagined it could. And that just goes to show you, dreams can become reality, friends.
After hiding somewhere in the depths of my brain for the better part of 2 years, the idea for this pie politely reminded me to of its existence as the first fall leaf fell from the sky this autumn. Leave it to Mother Nature to jog your memory and nudge you in a delicious direction. The flavors and textures were what first came to mind. Then I had to build a pie around the initial idea.
Imagine Nutella in pie form
Think of that rich and creamy chocolate combining with warm and toasty hazelnut creating that classic Nutella flavor. Now imagine those flavors baked together inside an undeniably delicious and flaky pie crust made with real butter and chocolatey notes. That's where this Chocolate Hazelnut Maple Bourbon Pie recipe begins. But it's go so much more to give still!
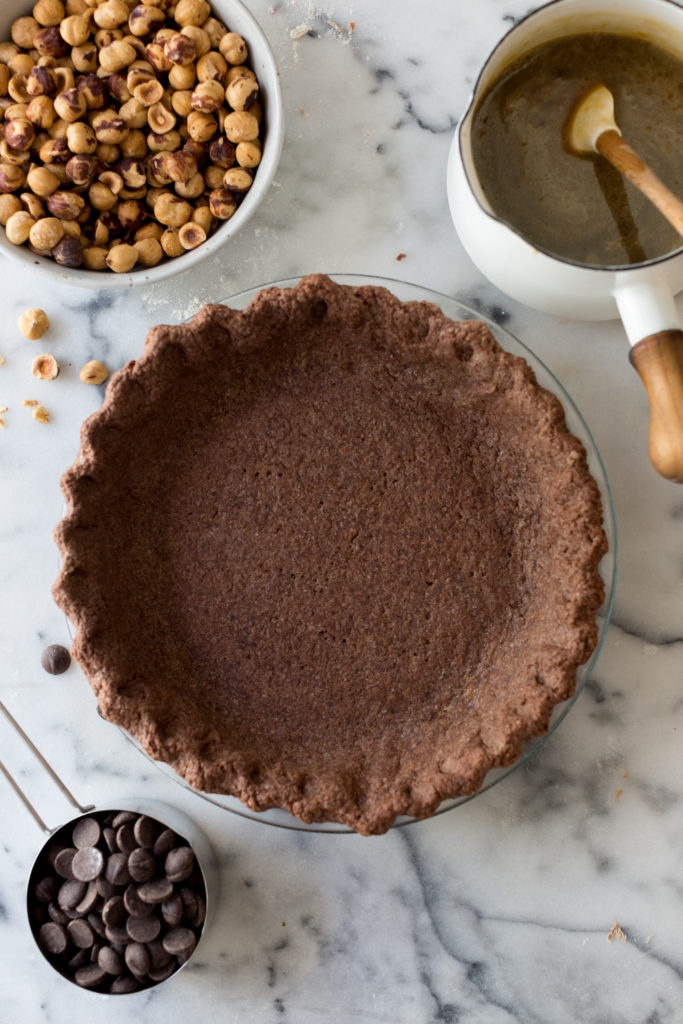
Start with my Chocolate Pie Dough
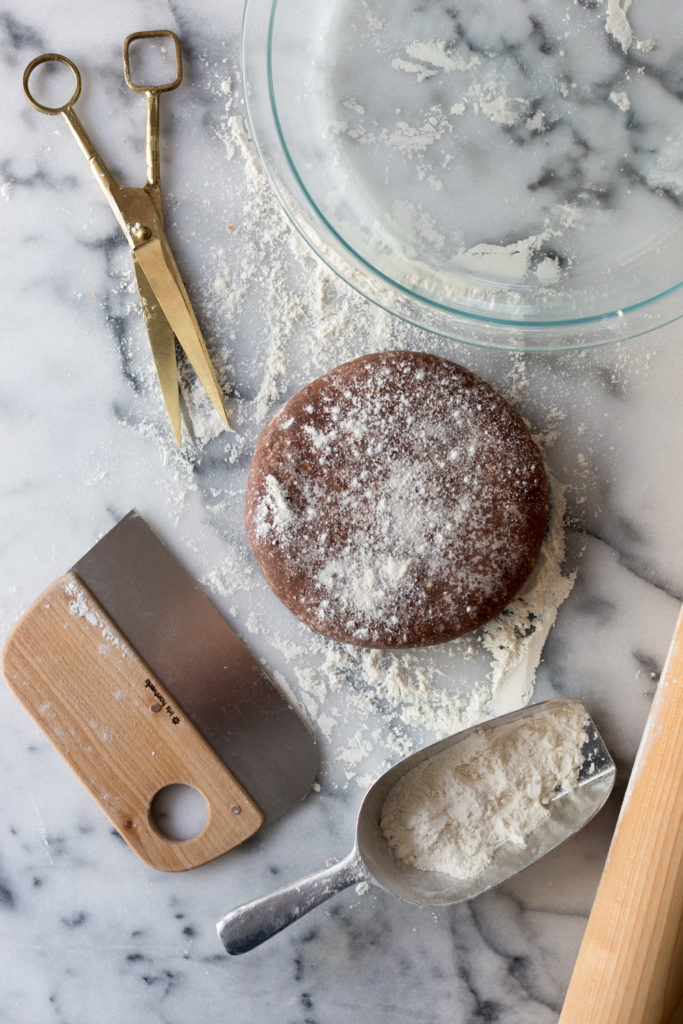
There is nothing quite as satisfying as a buttery, tender and flaky pie dough recipe. Unless of course you add chocolate. My easy Chocolate Pie Dough recipe has all of the classic qualities of a great pie crust, with the added bonus of chocolate undertones. It adds even more depth and dimension to this flavorful pie.
How to make maple bourbon pie filling
Yes, it's kind of all in the name. However, this custardy rich filling is much more than the sum of its parts. The filling is rooted in a classic Pecan Pie spirit with a nutty, rich filling. But, this Chocolate Hazelnut Maple Bourbon filling bakes up into a textural flavor journey that goes above and beyond any basic Pecan Pie you've ever experienced.
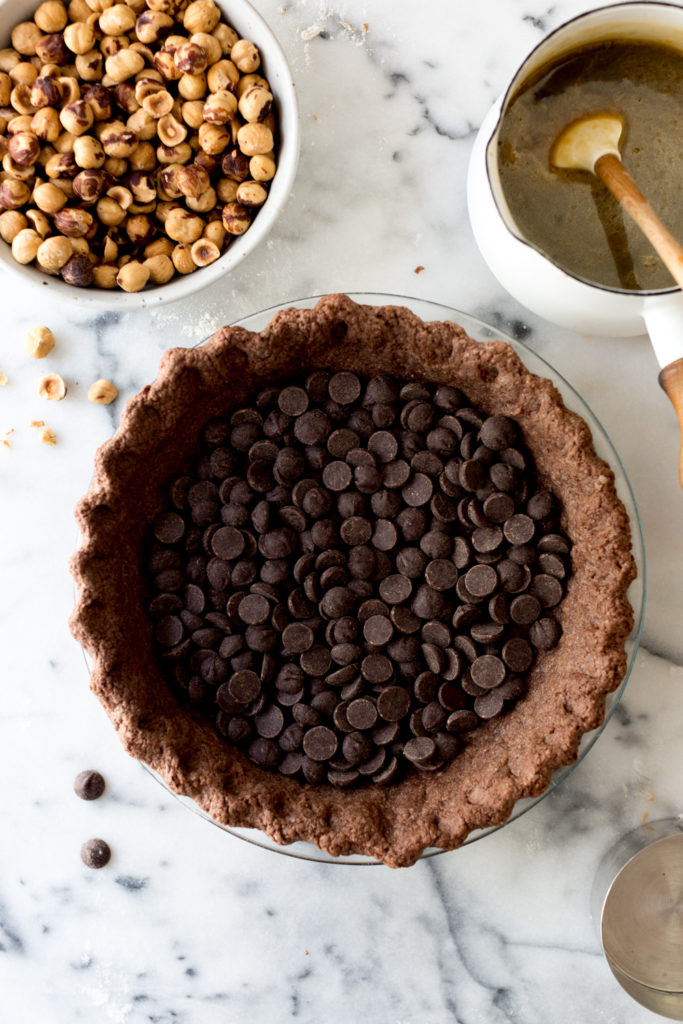
- Dark Chocolate Chips layer between the bottom chocolate crust and the custardy filling. As the pie bakes, the chocolate chips melt into a smooth layer that not only adds depth in flavor but it also a creamy, melty texture. It creates a barrier between the crust and filling, which in turn, helps fight off soggy bottoms! What a great bonus.
- Maple syrup gives the filling a softer and more natural sweetness than traditional corn syrup. It adds a rich and luxurious viscosity to the filling, imbuing it with warm toffee and caramel-like notes.
- Bourbon rounds out all of that rich indulgence, mellowing the sweetness while enhancing the cocoa and maple palette. It really ties all of the flavors of the pie together.
- Hazelnuts add all kinds of goodness to this pie filling. First the filberts are lightly toasted to bring out their natural nuttiness. You may need to remove the skins after toasting by rubbing handfuls of hazelnuts together in a clean kitchen towel. The lightly crunchy texture of hazelnuts gives this pie its signature bite. Those toasty hazelnuts are a delightful contrast to the rich custardy filling.
- Brown Sugar adds in a mellow, molasses sweetness. Granulated sugar works too but that brown sugar really goes best.
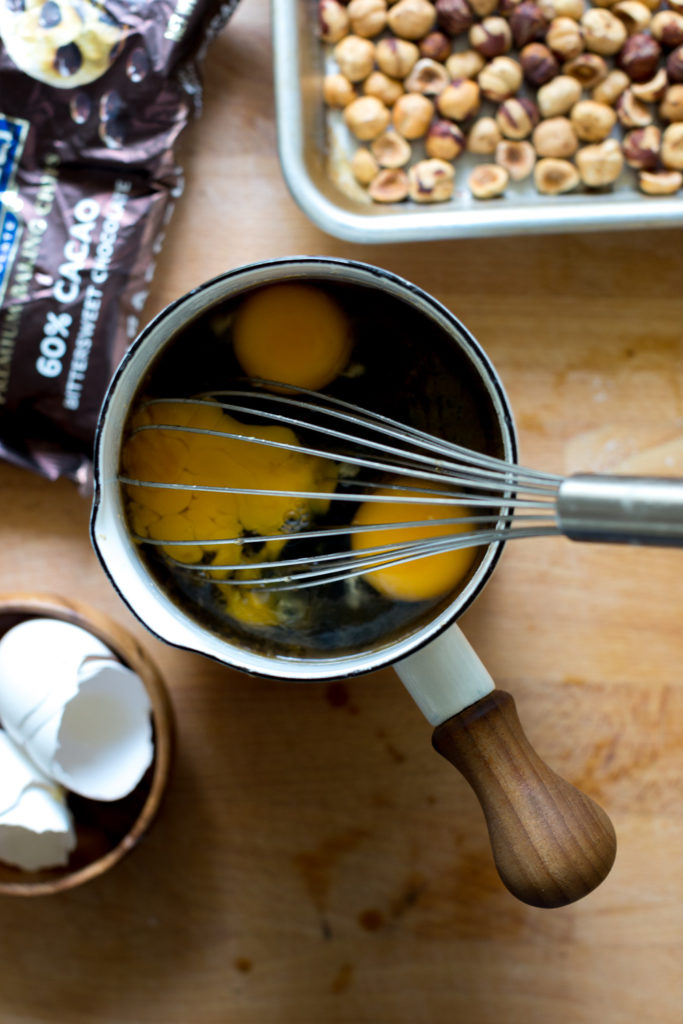
- Eggs give this filling that classic custardy vibe. The way the eggs combine with the maple and bourbon as it thickens into a velvety smooth custard-like filling in the oven is just plain magic.
- Butter brings depth. Adding creamy luxury to the custard.
- Vanilla helps out again with the flavor round-up. It kind of serves as a bridge between flavors so they all work together in a rich, cohesive Chocolate Hazelnut Maple Bourbon filling.
With all of those complimentary flavors swimming together, they set up under the heat of the oven creating a rich and custardy flavor that would be hard not to love. This is pure luxury right here. It gives off Pecan Pie essence but with much more depth in personality.
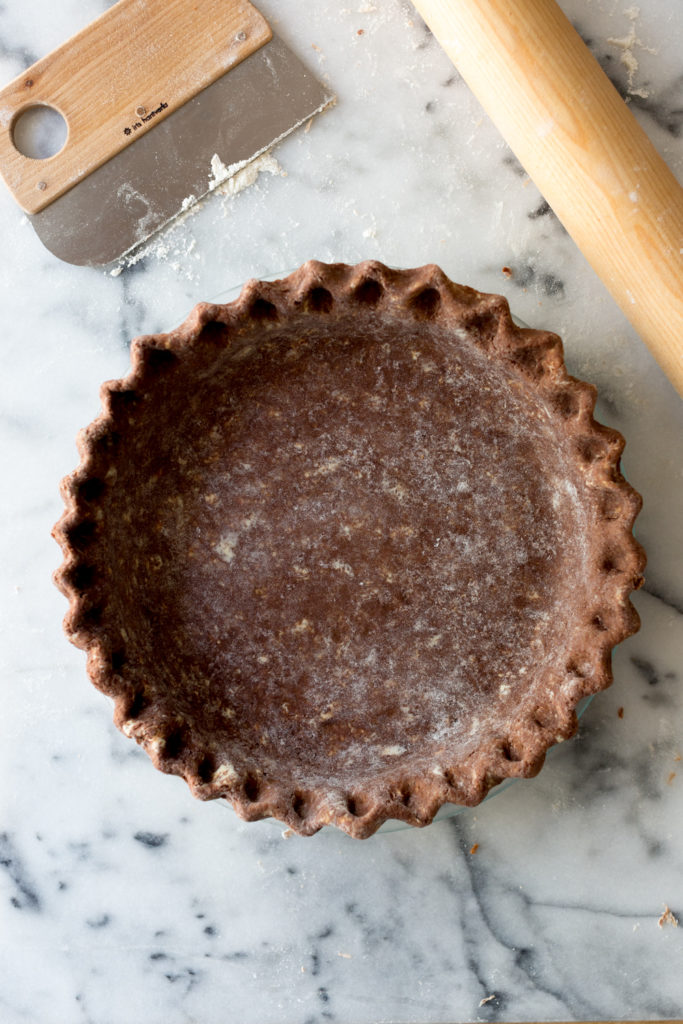
How to shape chocolate pie shell
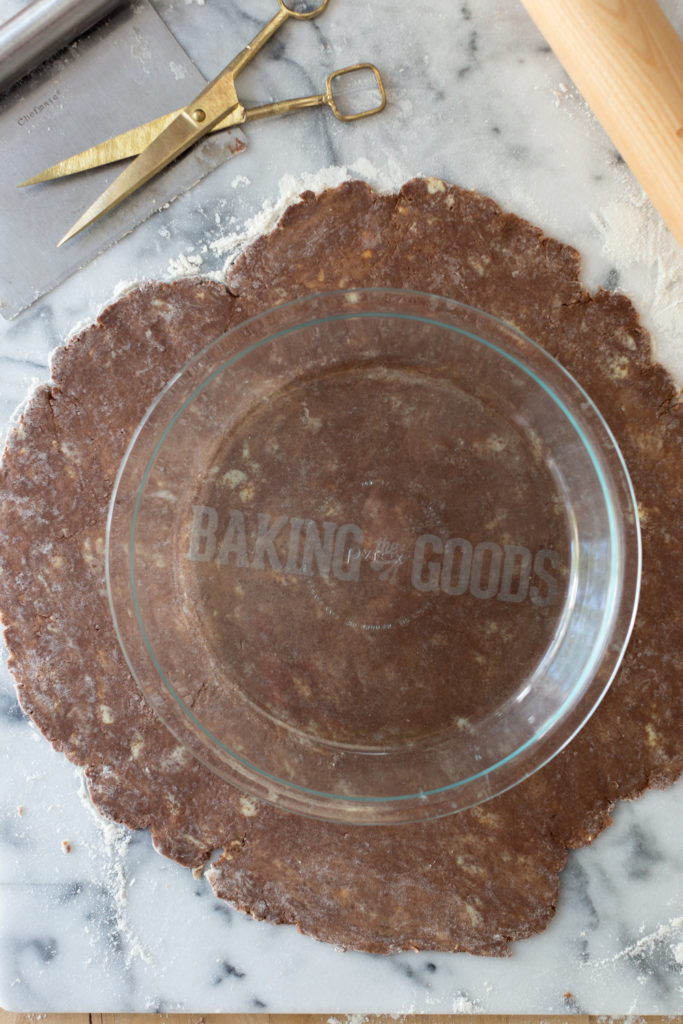
- First, roll out the Chocolate Pie Dough disk until it is 1"-2" larger than your pie pan. It should be about 11"-12" around.
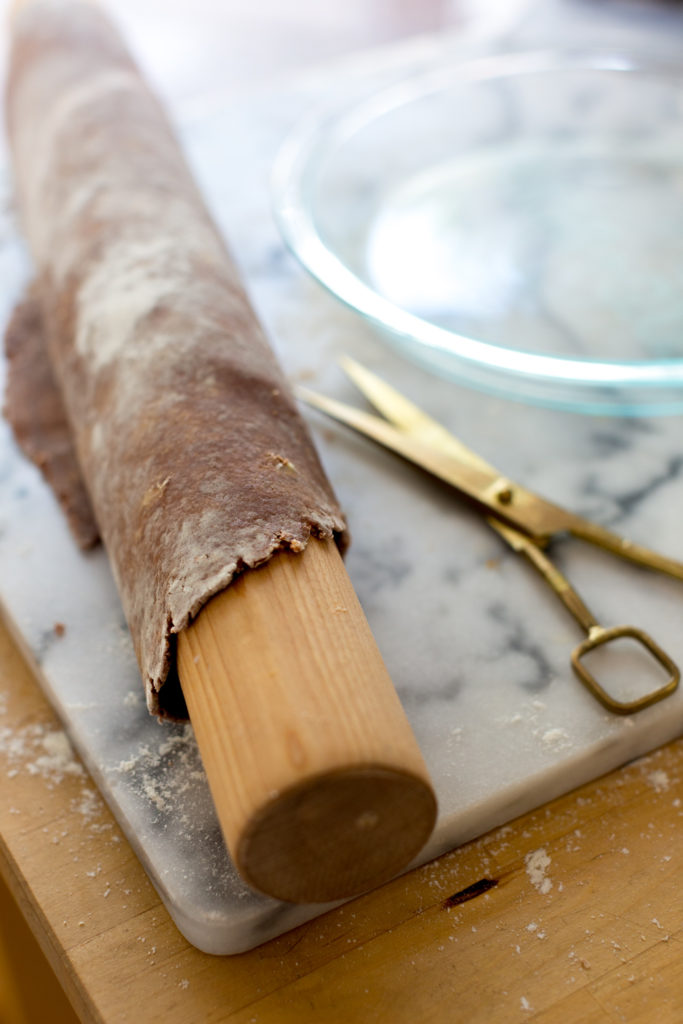
- Then, transfer the dough round into the pie pan by rolling the dough back around the rolling pin then unrolling it back into your pie dish. Easy as pie.
- Next, Trim off the excess dough so you have about 1" overhang all the way around the rim. Be sure to ave and gather those pie dough scraps into a little disk.
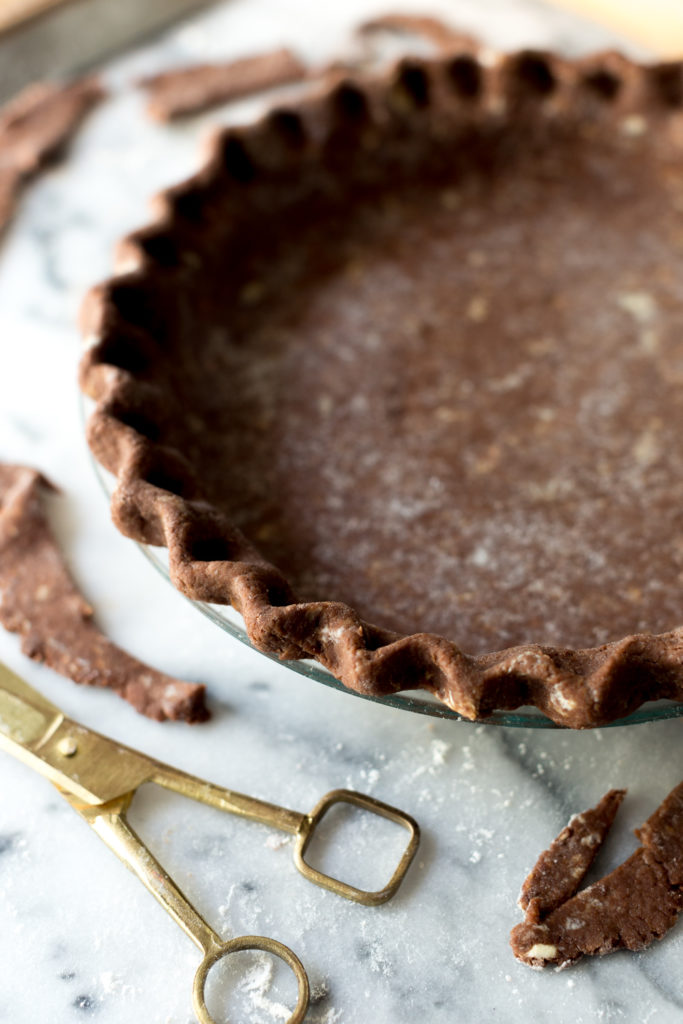
- Now, tuck the overhanging edge under itself to create a smooth rim all the way around.
- Then, flute the edges by pinching the dough between your thumb and pointer finger on one hand and your pointer finger or knuckle on the other all the way around the rim.
- To finish, use a fork to make small pricks in the bottom of the shell. This allows air to escape as it bakes to the pie shell doesn't puff up.
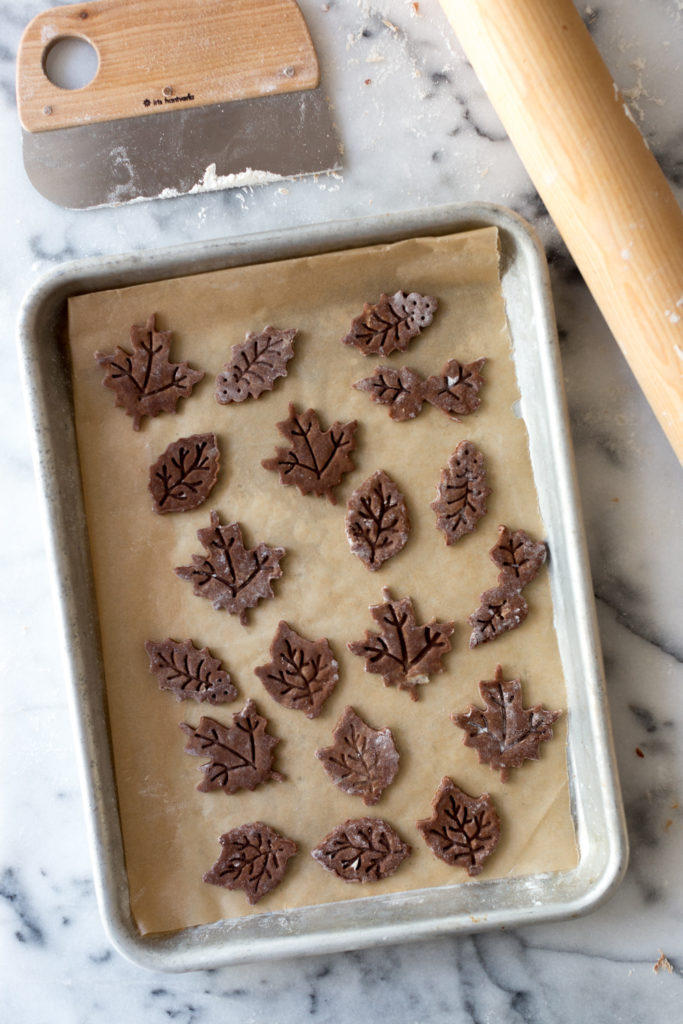
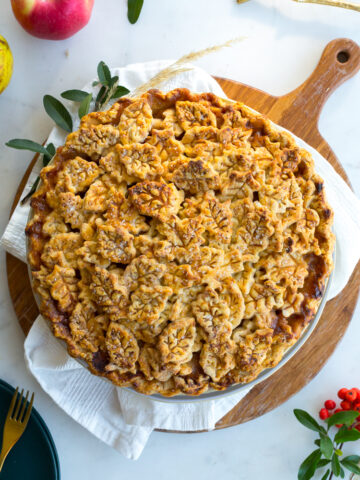
- Finally, roll out those gathered scraps and cut fun little decorative shapes by hand or using pie stamps. They bake separately but alongside the pie shell and get added to the finished pie for a fancy finish!
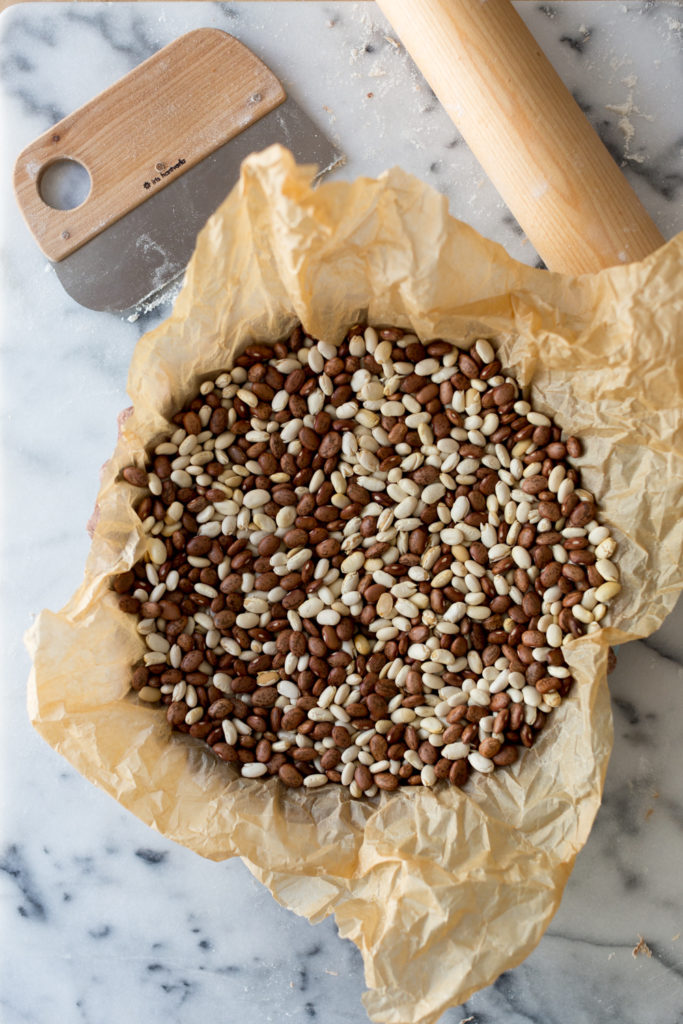
How to par-bake the chocolate pie shell
Par-baking single crust pies is a critical step. This technique is key for pies such pumpkin pies, pecan pies, sugar cream pies, etc. While it may seem like an annoying step, par-baking is critical to preventing soggy bottoms and shrunken pie dough.
By lining the pie shell and filling it with weights, you are par-baking the pie shell. This gives it structure and seals the dough so it holds up to the liquid fillings. In turn, keeping your pie from getting the dreaded soggy bottom. The weights help the pie shell maintain its shape and keep it from slouching into the pie pan. I usually just use dry beans here but pie weights or rice work too! The Chocolate Pie Dough will finish baking completely once filled baked with the filling.
During that last 5 minutes of baking the Chocolate Pie Shell you will carefully remove the pie weights. Then bake for an additional 5 minutes so that outer shell of the pie dough is crisp. This helps to keep the liquid pie filling from penetrating the bottom pie shell. And you guessed it, keeps those soggy bottoms far away from your Chocolate Hazelnut Maple Bourbon Pie!
How to fill the Chocolate Hazelnut Maple Bourbon Pie
Filling this Chocolate Hazelnut Maple Bourbon Pie is simple.
- First add a layer of chocolate chips. Those babies will melt while the pie bakes and create a smooth layer of chocolatey goodness between the pie shell and filling. Bonus, it helps keep that filling from penetrating the shell, ensuring no soggy bottoms!
- Next add the whole, toasted hazelnuts right on top of the chocolate chips.
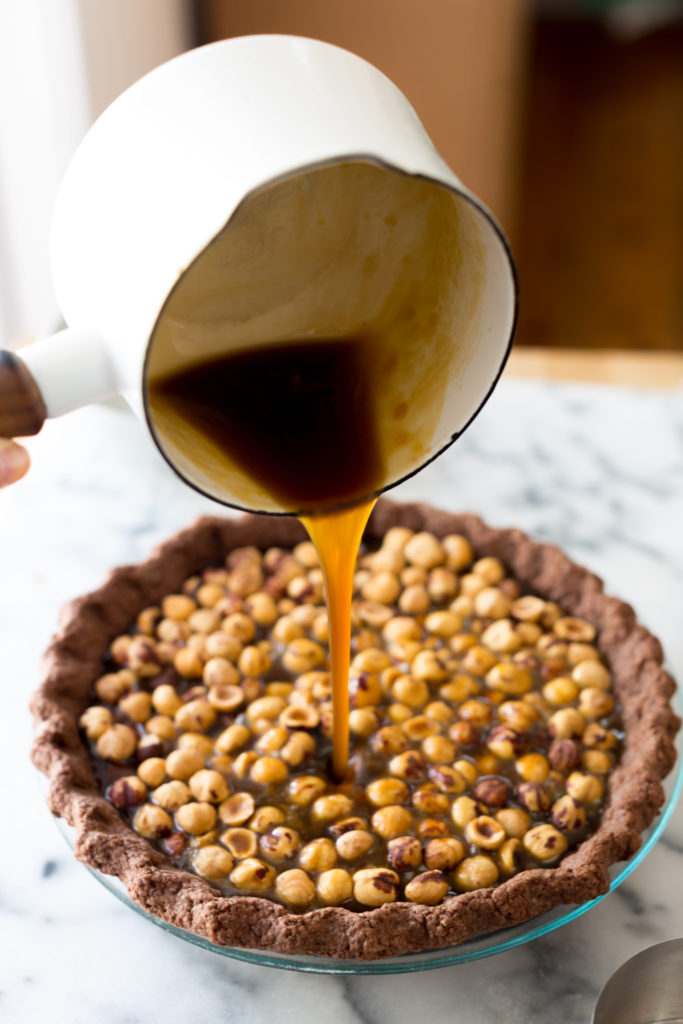
- Finally pour the maple bourbon filling directly over the hazelnuts and bake!
First you add a layer of chocolate chips. Those babies will melt while the pie bakes and create a smooth layer of chocolatey goodness between the pie shell and filling. Bonus, it helps keep that filling from penetrating the shell, ensuring no soggy bottoms!
Chocolate Hazelnut Maple Bourbon Pie will be the star of your holiday table
This Chocolate Hazelnut Maple Bourbon Pie is an instant classic. Sure, it's been a long time coming but I am so happy to share this gorgeous pie with you. While it was worth the wait, we are all better off knowing this delicious pie recipe exists. Especially during holiday pie baking season.
Add this textural Hazelnut Maple Bourbon Pie with Chocolate Crust to your pie roster immediately because this beauty is the missing piece on your holiday table! Or possibly the missing piece to a random Tuesday night at home. Either way, this Chocolate Hazelnut Maple Bourbon Pie is ready to party!
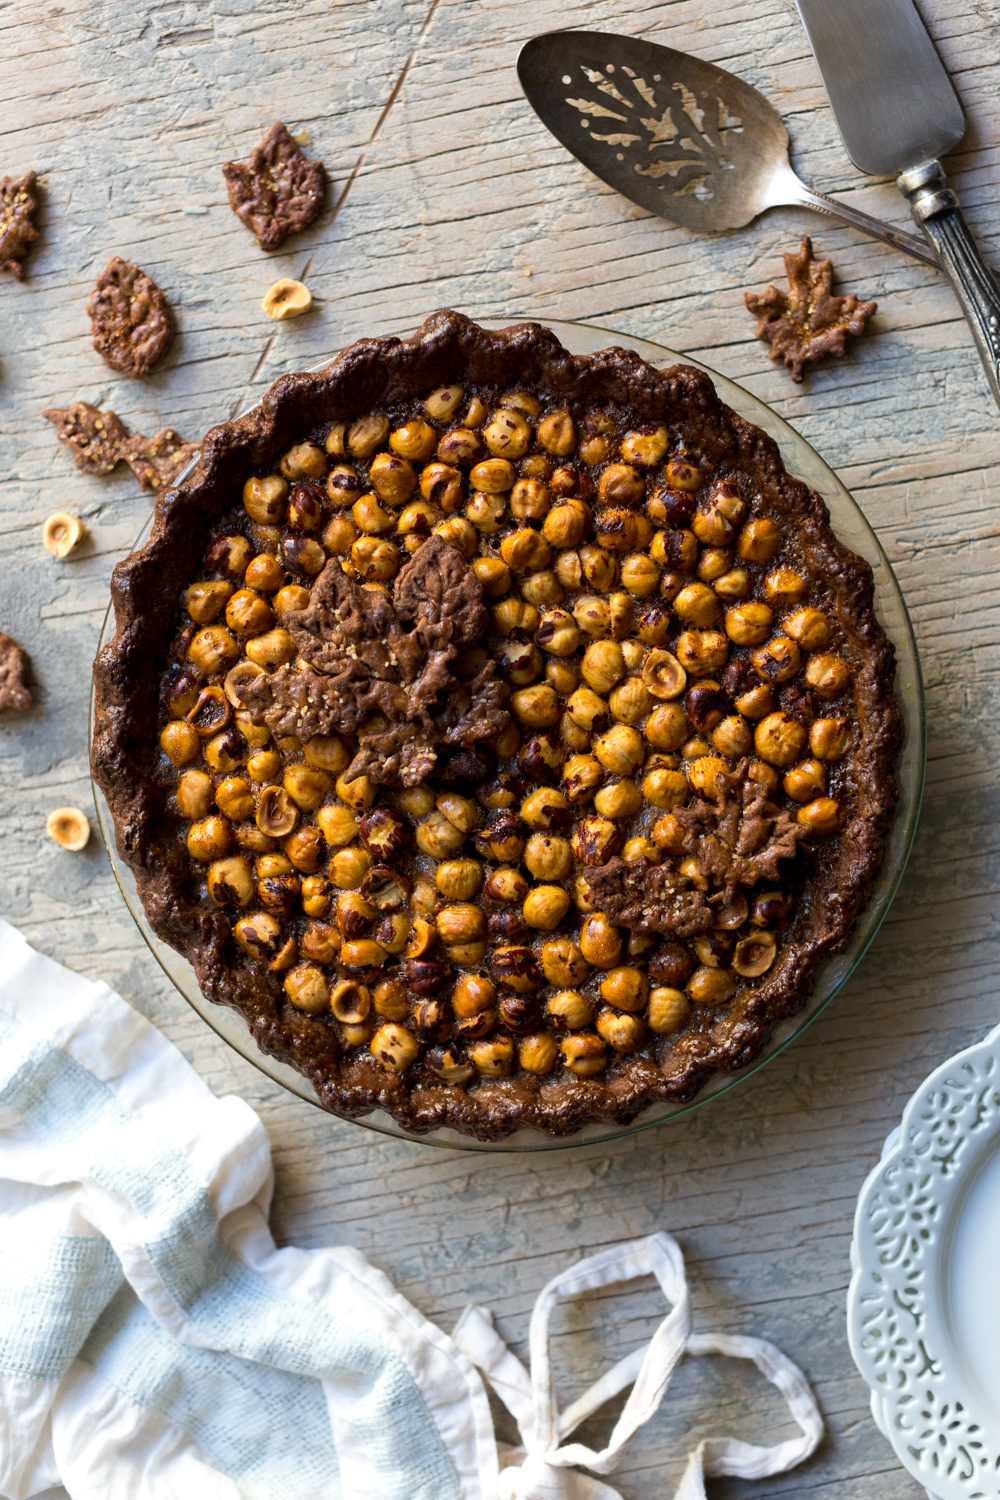
 to decorate the top. It really fancies up the Chocolate Hazelnut Maple Bourbon Pie!
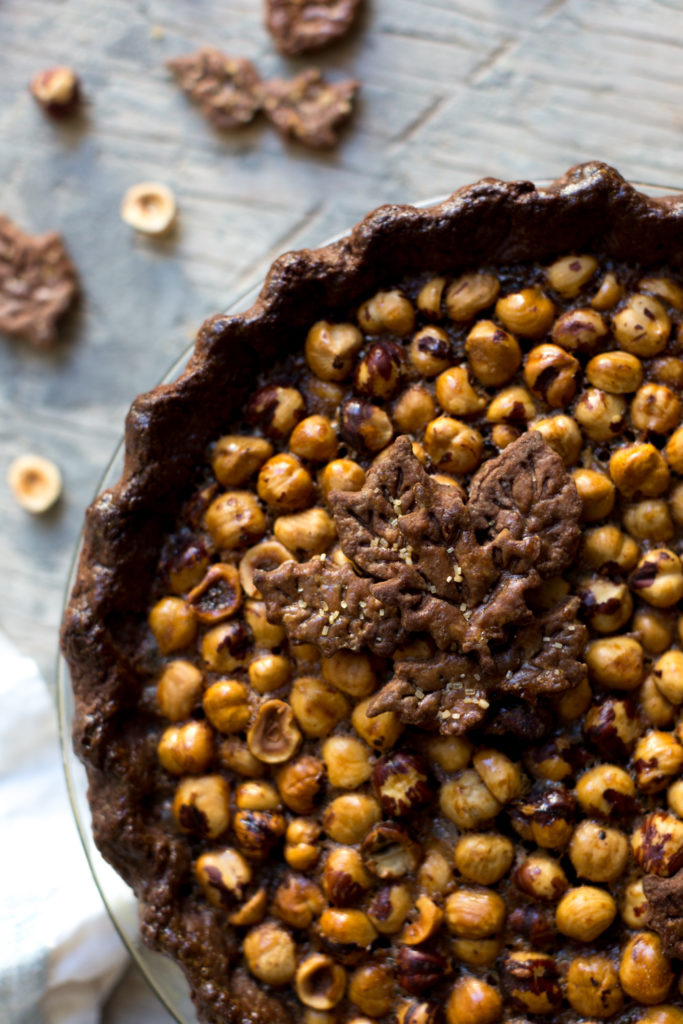
Recipe

Chocolate Hazelnut Maple Bourbon Pie
- Total Time: 2 hours 15 minutes
- Yield: 8 slices 1x
Description
This Chocolate Hazelnut Maple Bourbon Pie has a deep chocolate all butter crust, dark and smooth chocolate chips & crunchy, toasted hazelnuts in a rich maple bourbon custard.
Ingredients
Maple Bourbon Hazelnut Pie
- 1 Chocolate Pie Dough disk Recipe: bakingthegoods.com/chocolate-pie-dough
- ¾ cup maple syrup
- ½ cup brown sugar
- 3 tablespoons unsalted butter
- 2 tablespoons bourbon
- 1 teaspoon pure vanilla extract
- 1 teaspoon salt
- 3 large eggs, at room temperature
- 1 cup dark chocolate chips
- 2 cups hazelnuts, skinned, whole & lightly toasted
Egg Wash
- 1 large egg, at room temp
- 1 tablespoon turbinado or sparkling sugar
Instructions
Shape & Par-bake the Chocolate Pie Crust.
If using frozen dough, either defrost in the refrigerator overnight or on the counter for 1.5-2 hours before rolling.
- Allow the dough disk to warm up for a few minutes on the counter, you should be able to easily make an indention when you press your thumb lightly in the top of the dough disk.
- On a lightly floured surface, use a rolling pin to roll out the first pie dough disk into a 11"-12" round about ¼" - ⅛" thick.
-
Gently transfer the rolled dough into a 9" pie pan, leaving a 1-2" overhang all the way around. Tuck the edge underneath itself to form a ring around the edge of the pie plate.
-
Flute the edges by pinching the dough between your thumb and pointer finger on one hand and your pointer finger or knuckle on the other. Use a fork to prick small holes into the bottom of the pie shell. Place the pie shell in the freezer and chill for at least 20 minutes.
*Don't waste the scraps, gather them together and re-roll, then cut leaf stamps or desired shape. Place on a lined baking sheet in the freezer. You will bake these separately.
- Preheat oven at 425°F.
- Place the frozen pie shell on a lined baking sheet. Then line the chilled pie shell with a layer of parchment paper or aluminum foil. Fill the lined shell with beans, pie weights or rice. Be sure the weights fill the entire shell and reach to the edges and up the sides.
- Bake with weights for about 15 minutes, until the crust barely begins to turn a deeper color and starts to look dry. Carefully remove the lining and weights, then bake for another 4-5 minutes until the bottom of the shell looks dry, too. Allow to cool on a rack.
*If you have dough scraps decorations, lightly beat the egg for egg wash. Gently brush the leaves with the egg wash and sprinkle with turbinado sugar. Bake on a lined baking sheet alongside the pie shell, until the leaves are crisp and a deep brown color, about 10-15 minutes.
Prepare the Filling
- Turn the oven down to 350° F.
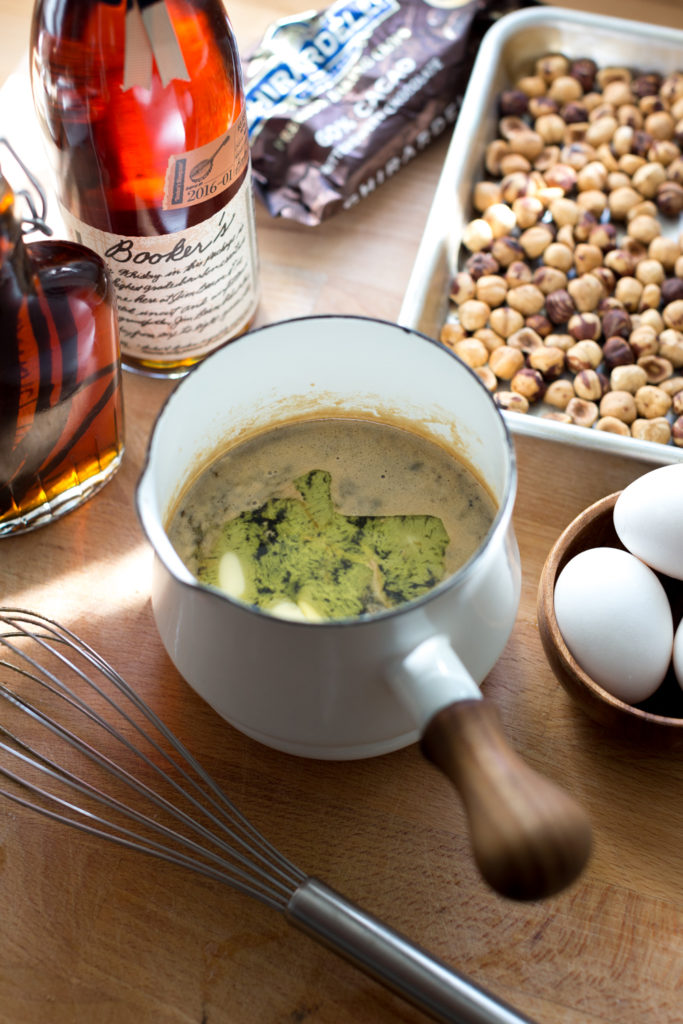
- Whisking the brown sugar and maple syrup together in a heavy saucepan over medium heat until the sugar is fully dissolved. Remove from heat.
- Whisk in the butter, bourbon, salt and vanilla. Allow the mixture to cool.
- Once the mixture has cooled way down, lightly whisk in the eggs. Mix until the mixture is fully blended and starts to thicken.
*If the mixture is too warm, the eggs will begin to cook and the yolks will start to curdle.
Bake the Pie
- Whisk together the egg with about 1 teaspoon of water to make the egg wash.
- Once the pie shell has cooled, layer the chocolate chips on the bottom of the shell. Then top with the toasted hazelnuts.
- Carefully pour the maple bourbon filling over the top.
- Gently brush the edges of the pie crust with egg wash and sprinkle with turbinado or sparkling sugar.
- Place on a baking sheet and bake on the center rack of the oven at 350°F for 40-45 minutes. Until the filling is set; rotating the pan halfway through. The filling should be just barely jiggly in the center when ready.
- Place on a cooling rack and allow to cool for a least 2 hours before cutting. Decorate the pie with baked crust cookies in any design your heart desires.
Notes
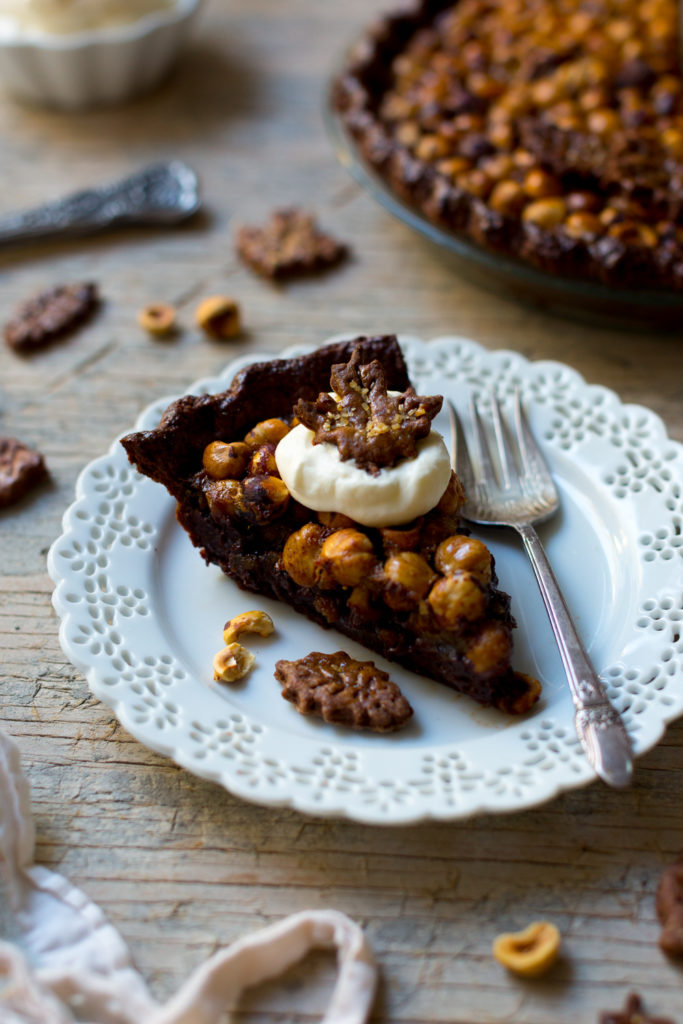
Serve plain, with fresh whipped cream or à la mode with a simple vanilla bean ice cream.
- Prep Time: 1 hour 30 minutes
- Cook Time: 45 minutes
- Category: Dessert
Comments
No Comments